Quantcast
Channel: Made by CustomMade
Viewing all 105 articles
Browse latest View live

Why Everyone Should Care About Rainwater Harvesting

$
0
0

Why Everyone Should Care About Rainwater Harvesting Infographic

(and How to Do It)

Rain, rain, go away? Don’t be so quick to reject the water falling from the sky. Turns out harvesting rainwater is an ancient practice with loads of modern-day benefits. Here’s the lowdown on the practice, and how to put the rain that falls on your home to good use.

What Is Rainwater Harvesting?

Quite simply, rainwater harvesting is the practice of collecting and storing rainwater (typically from the roof of a home or building) for later use. Rainwater harvesting systems range from the very simple—a rain barrel placed under the downspout of a building’s gutters—to more complex options that plug into a building’s plumbing system. The practice is popular across a wide range of demographics, from rural gardeners to people living in urban centers.

Even though rainwater harvesting has been practiced for thousands of years, it’s only beginning to inspire the formation of an organized industry. In recent decades the American Rainwater Catchment Systems Association, which promotes sustainable rainwater practices as a means of solving water and energy challenges throughout the world, has emerged as an industry leader. Despite its influence, there are currently no national standards regulating the collection and use of rainwater, although many states and municipalities have instated laws around its use.

Rain Check: Harvesting Facts and Figures The Benefits of Rainwater Harvesting

For those whose communities allow them to collect rainwater, the practice offers a number of environmental and economic benefits. For starters, harvesting rainwater helps control storm-water runoff, which reduces the risk of erosion in gardens and around downspouts, minimizes the impact on local storm-water infrastructure and combined sewer systems, and helps reduce the threat of flooding.

Not only does rainwater harvesting help environmental and human infrastructure cope with large amounts of rain (and save municipalities money), but it also puts that water to good use. Stored rainwater can be used for both outdoor and indoor uses, including landscape irrigation, watering plants or gardens, toilet flushing, laundry, washing cars or patio furniture, and even bathing or drinking (although using rainwater for drinking requires treatment prior to use).

Rainwater’s many uses can help people save money on utility bills—especially because the water is practically free (minus the cost of the collection system). The roof of a 1,000-square-foot house can collect around 600 gallons per one inch of rain—that’s enough free water to fill more than 15 bathtubs! Additionally, some communities offer rebates or reduced fees to homeowners who practice rainwater harvesting.

Another great benefit of rainwater harvesting is it decentralizes the water supply. That means instead of being completely dependent on municipal sources, consumers who choose to harvest rainwater have more control over how their water is sourced, treated, and put to use. In fact, some people are motivated to install rainwater-harvesting systems for the sole purpose of having a private, protected source of water in case of emergency or if the municipal water supply becomes contaminated.

How to Harvest Rainwater at Home

Ready to hop on the rainwater harvesting train? It’s helpful to ask yourself a few questions before getting started. Most importantly, consider:

  • For what purpose(s) do you want to use rainwater?
    The way you plan to use rainwater will determine how much rainwater you’ll need to collect, the system you’ll need to use, and the costs, equipment, and maintenance involved. For example, collecting rainwater for watering plants will require a vastly different system than using rainwater for in-home activities, such as flushing the toilet, showering, or doing laundry.
  • What are the laws in your area concerning rainwater harvesting?
    Some states consider rainwater the property of the state and prohibit its collection, while other regions encourage homeowners to participate in rainwater harvesting. Consult with your local government (try the health department or environmental quality department) before setting up any harvesting systems.

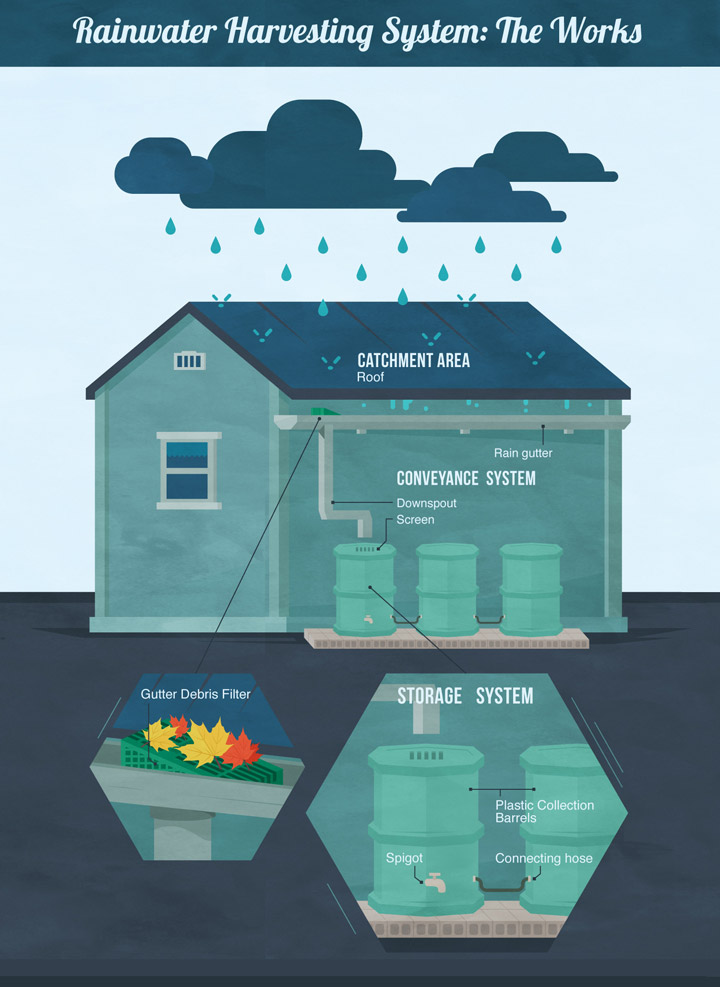
Once you’ve determined the answers to the questions above, it’s time to choose a rainwater harvesting system. While they vary in size, complexity, and function, all systems share the same basic components:

  • Catchment area: This is the area that first captures the rainfall; it is most commonly the roof of a building or house.
  • Conveyance system: This refers to whatever moves the water from the roof to its storage area—for example, gutters, downspouts, and piping.
  • Storage system: Typically a barrel, cistern, or tank, this is what collects the rainwater for later use.
  • Distribution system: This refers to whatever is used to move the water from the storage system to wherever it’s being used—whether that’s a watering can or an underground irrigation system.

Rainwater Harvesting System: The WorksIn their simplest forms, rainwater harvesting systems consist of a barrel placed under a building’s downspout. Other options include aboveground and underground cisterns, drip irrigation systems, professionally landscaped rain gardens, and systems that hook directly into a building’s plumbing. The specifications of more advanced systems (which can cost thousands of dollars) will vary based on your needs and the system used.

If you’re interested in simple rainwater collection, your best bet is the popular barrel-under-a-downspout system. High-quality rainwater barrels tend to cost approximately $100 and should include a spigot that allows users to easily fill up watering cans or attach a hose. DIY-inclined people may choose to build their own barrel or customize a large garbage can. If you want to give DIY a try, check out this resource for detailed instructions.

Once you’ve procured your barrel(s), there are a few important factors to keep in mind prior to and after installation:

Dos and Don'ts to Keep Your System Running With Every Rain 
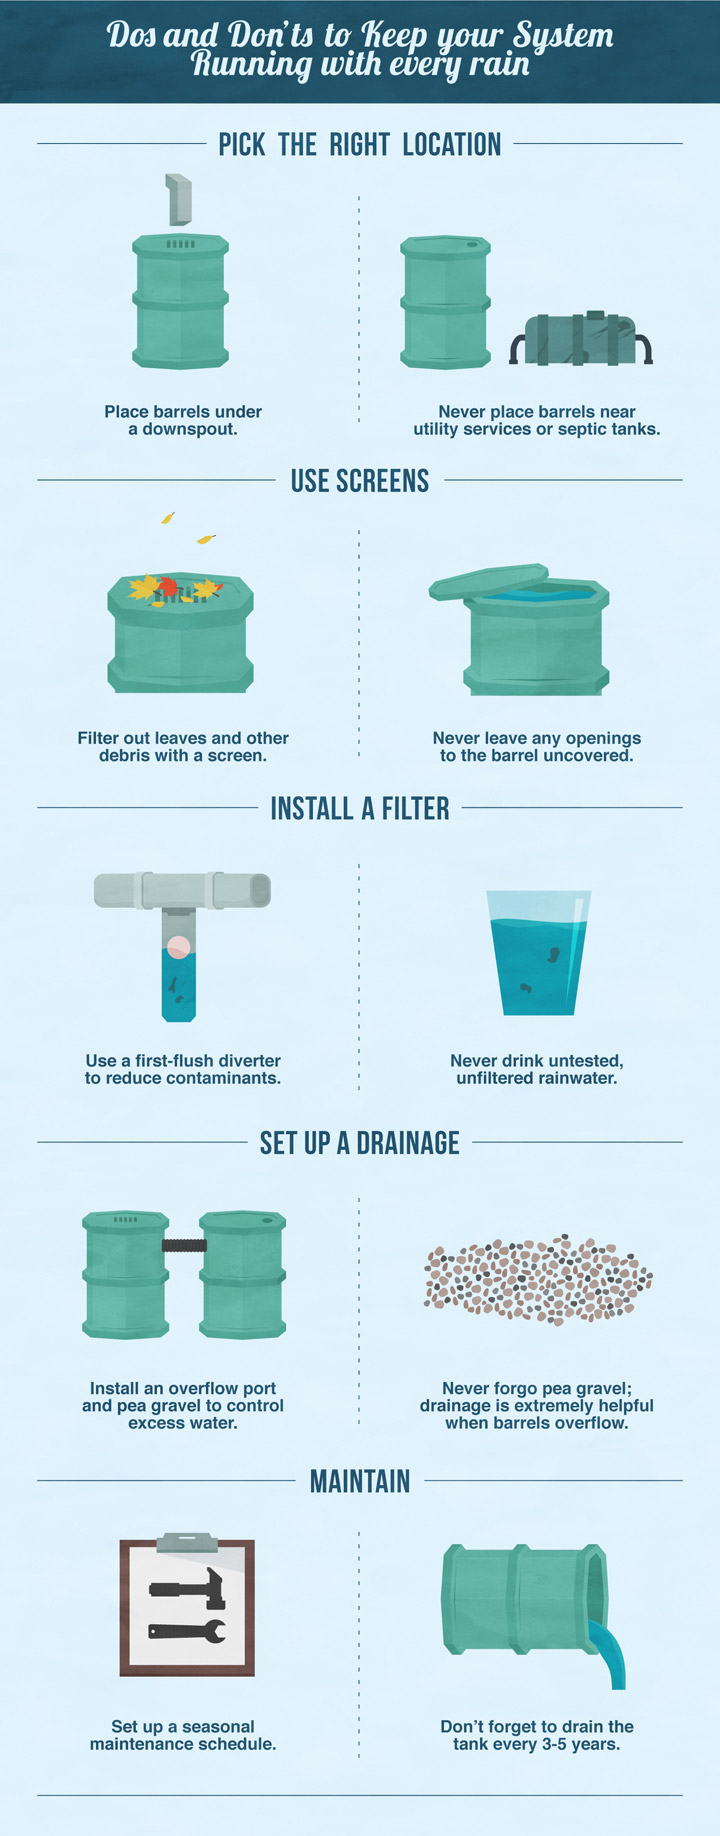
Location: Rain barrels can be installed along houses, under decks, or in other unused spaces. Locate barrels under a downspout (ideally one that’s closest to the area where you’ll want to be using the water). Be sure not to place the barrel near utility services or septic tanks.

Roof: The material of your roof will affect how much water can be collected in addition to the quality of the water. As stated earlier, the average (25 foot by 40 foot) home roof sheds approximately 600 gallons of water in one hour of moderate rainfall. That means every downspout attached to your roof will divert a portion of those gallons to the barrel underneath it. The more barrels you have, the more rainwater you can collect.

Screens: It’s helpful to place a screen over the area where the downspout meets the gutter in order to help filter out leaves and other debris and to keep the downspouts from getting clogged. A fine-mesh aluminum window screen can help keep insects out of the water in the barrel, as well. Also be sure to keep all openings to the barrel covered.

Installation: The higher you raise the barrel(s), the better the water pressure when you use the spigot. A simple way to raise the barrel is to place it on top of a flat bed of cinder blocks. Start by digging a four-inch deep area the length and width of the cinder block base. Fill the area with quarter-inch pea gravel in order to help you level the cinder blocks (this will also help to keep the foundation dry). Line the area with the cinder blocks and then position the barrel on top. Note: Some municipalities regulate the manner in which rain barrels can be installed; some even require the base to be designed by a structural engineer. Be sure to review your community’s rules before installing your rainwater harvesting system.

Usage: Because rain can wash various contaminants into the water (for example, bird poop, bacteria, parasites, or chemicals from your roof), experts advise that water collected in rain barrels not be used for drinking, bathing, or watering plants you intend to eat unless it is specifically treated for these uses.

Filters: There are a variety of filters and disinfection systems that can treat water to acceptable levels of quality. A “first flush diverter” is a simple device that can help reduce contaminants by removing the first water that comes out of the system, since it’s likely to contain the most contaminants. Water intended for drinking needs to be filtered, disinfected, and tested regularly.

Overflow: During particularly heavy rains, it’s possible the barrel may overflow. The pea gravel under the cinder blocks will help to drain this excess water away from the barrel. You may also choose to install an overflow port near the top of the barrel (attaching it to a hose can divert excess water directly to a garden or lawn).

Maintenance: A great way to help keep your rainwater free of contaminants is to follow the seasonal maintenance schedule outlined in this guide. Also be sure to visually inspect the system’s components regularly and make any replacements or repairs immediately. Drain the tank a minimum of every three to five years in order to check for deterioration and clean out debris.
And there you have it: the basics of rainwater harvesting. Now get out there and dance in (or collect) the rain!

Why Everyone Should Care About Rainwater Harvesting Infographic

Copy and paste to embed in your website:

Author information

CustomMade

CustomMade

CustomMade is an online marketplace connecting customers who want one-of-a-kind creations with professional and passionate makers of those goods.

The post Why Everyone Should Care About Rainwater Harvesting appeared first on Made by CustomMade.


7 Reasons to Join the Urban Homesteading Revolution

$
0
0

7 Reasons to Join the Urban Homesteading Revolution

I grew up in a fairly typical late-20th-century family. We lived a few blocks from the center of town. We bought all of our food at a chain grocery store—and much of it was instant, frozen, or packaged. I’d never spent much time around livestock or farms, but at a young age, I longed to grow a garden, bake bread, and cook from scratch.

When I was in college, I pored over back issues of Mother Earth News and devoured Living the Good Life, Helen and Scott Nearing’s memoir about homesteading in Vermont, which helped launch the back-to-the-land movement of the 1960s. At the same time, I loved living close to a city center—riding my bike and walking everywhere, spending the afternoon at the library or swimming pool, going to book readings and events, and living close to my friends. It was hard to imagine leaving all of it behind, although I always thought I might.

When my husband and I were considering buying our first house, we realized we might be able to combine the best of urban living with the best of the back-to-the-land movement. We weren’t alone: Around the time our son was born in 2008, a lot of people were talking about “urban homesteading.”

What is urban homesteading? In short, it looks different for every family. For mine, it means we live in a regular, ranch-style house in the city. In our backyard, we have a small flock of three chickens and a large vegetable garden that provides us with peas, greens, tomatoes, corn, squash, beans, and herbs. We compost. We cook nearly all of our meals from scratch, including bread, tortillas, and pizza crust, and we brew beer. We chop wood to heat our house, and we hang our laundry on a clothesline. We make most of our own household cleaners and personal care products out of simple ingredients, like baking soda and vinegar. Biking is our main form of transit. And we try to be intentional about the things we buy. For other families, urban homesteading includes keeping bees, raising rabbits, making clothes, or preserving food.

More than anything, urban homesteading is a mindset. It turns us from consumers who are disconnected from where our food and belongings come from into producers who use our hands to make some of what we need to live. Most of us have little desire to be as self-sufficient as the original homesteaders had to be and the back-to-the-landers strived to be. In my family’s case, we’re thrilled to take advantage of all of the wonderful elements of urban life, including farmer’s markets and grocery stores as well as chocolate, coffee, and cultural events.

In some areas, urban homesteading has become mainstream. Where I live in Eugene, Oregon, nearly everyone I know has a vegetable garden and a flock of backyard hens. It’s no wonder the movement is picking up steam. There are many excellent reasons to celebrate the revolution.

1. Homegrown food is safer, more nutritious, and tastes better.

When the latest salmonella or e-coli outbreak dominates the headlines, it’s comforting to know exactly where your food comes from and how it’s raised. And because vitamin content is depleted by light, temperature, and time, freshly picked produce grown near your house is more nutritious than conventional produce, which is transported an average of 1,494 miles before it reaches the grocery store.

An even more delicious reason to celebrate homegrown food is the flavor. Gourmet chefs use the freshest ingredients they can find for a reason. The first time I cooked one of the eggs laid by our hens, I couldn’t believe how large and yellow the yolk was or how delectable it tasted. And it’s easy to appreciate novelist Barbara Kingsolver’s zeal for sun-ripened garden tomatoes. “The first tomato brings me to my knees,” she writes. “Its vital stats are recorded in my journal with the care of a birth announcement.”

2. Urban homesteading encourages healthy movement.

When I started gardening and making more things around the house and yard, I noticed a side effect: I felt better. It’s not surprising. Digging the dandelions out of a raised bed, brewing an India Pale Ale, and peeling potatoes fall in line with the sort of daily activities most important for maintaining a healthy body weight, according to research conducted by Dr. James Levine at the Mayo Clinic. In Levine’s study, people were fed an extra thousand calories a day. Those who did the most daily non-exercise activity (as opposed to deliberate exercise for fitness) gained the least weight.

Non-Exercise Activity Helps Maintain a Healthy Body

And in a nine-country European breast cancer study, of all the activities and recreational exercise women partook in, household activity—including housework, home repair, gardening, and stair climbing—was the only activity to significantly reduce breast cancer risk.

We hear a lot about the dangers of sitting, and most of us have to sit for some part of the day. But increasing our movement in our daily lives can make a huge difference for our health and the way we feel.

3. Urban homesteading helps families connect with nature and the seasons.

Growing up in Colorado, I was fortunate to spend a lot of time hiking and camping. Gardening has given me an even more intimate connection with the natural world, since now I must work with it as a co-creator. And it has given my two young sons a wonderful relationship with plants and seasonal rhythms. They love the garden and beg to help plant seeds, pull weeds, and harvest. Every time one of them asks me if it’s pea or fig season yet, or recognizes an edible plant in someone’s yard, I smile. Those may seem like simple things, but for me as a kid, produce was something that was shipped across the country and delivered to a refrigerated section of the grocery store.

4. Urban homesteading is thrifty. 

It’s no coincidence the urban homesteading boom coincided with a worldwide economic recession. If you build your soil, save seeds, and tend your garden well, you can save hundreds of dollars on organic produce each season by growing your own. Keeping chickens can also save you money. We estimate that our eggs cost $3.35 a dozen (in organic chicken feed) at the most, compared to $5 to $7 for similar eggs at the health food store. However, we were lucky to inherit our chicken coop, so others may have to include that expense as well.

Cooking from scratch saves us the most money. It’s not just that making stock, microbrews, and bread products from bulk ingredients is cheaper than buying them. As we’ve become better chefs, we’re also not as apt to go to restaurants, which used to be a huge drain on our finances.

Save Money in the Garden: 5 Tips for Thrifty Growing

5. Turning a lawn into a homestead makes productive use of land and supports healthier ecosystems.

In the memoir Paradise Lot, Eric Toensmeier and Jonathan Bates recount how they transformed their backyard—one-tenth of an acre of compacted soil in Holyoke, Massachusetts—into a permaculture oasis where they grow about 160 edible perennials. What was once a barren lot is now habitat for fish, snails, frogs, salamanders, raccoons, opossums, woodchucks, bugs, and worms. “Imagine what would happen,” Toensmeier writes, “if we as a species paid similar attention to all the degraded and abandoned lands of the world.”

Most of us don’t have the skills or desire to garden on the scale that Toensmeier and Bates do. But by planting a few vegetables, herbs, or fruit trees, we create habitats for birds, butterflies, and pollinators. And by composting kitchen waste, chicken manure, and fallen leaves, we improve the ecosystem that supports all life.

6. Gardening and creating things boosts the spirits.

Author Matthew Crawford traded his job at a Washington think tank for a career fixing motorcycles because working with his hands made him feel more alive. “Seeing a motorcycle about to leave my shop under its own power, several days after arriving in the back of a pickup truck, I don’t feel tired even though I’ve been standing on a concrete floor all day,” Crawford writes.

We’ve all experienced the thrill that comes from making or fixing something. In her book Lifting Depression, neuroscientist Dr. Kelly Lambert explains that association. “When we knit a sweater, prepare a meal, or simply repair a lamp, we’re actually bathing our brain in ‘feel-good’ chemicals,” she explains. Lambert contends that in our drive to do less physical work to acquire what we want and need, we may have lost something vital to our mental well-being—an innate resistance to depression.

I can attest to what Lambert says. Almost nothing is as satisfying as appraising a finished scarf or jar of sauerkraut, or cutting the first slice off a loaf of homemade bread. I have no doubt that creating something with my hands every day—even a meal—is imperative for my mental health.

7. Urban homesteading encourages families to live, work, and buy more intentionally.

These days, before we buy something impulsively, my husband and I are more likely to ask ourselves some simple questions. Can we make, fix, or do this ourselves, and is it worth the time and energy? Sometimes the answer is no. For me, canning and making clothing are not worth the effort. But just asking these questions makes our family more intentional about how we live and work, and what we buy.

As a society, we’re often encouraged to make decisions based on two variables: time and labor. When it comes to household tasks, it’s usually seen as preferable to save both time and labor. While making a stew will take longer and require more physical work than buying a can, the process is enjoyable and good for the body. In addition, the homemade variety is healthier, tastes better, and brings greater satisfaction. Equations look different when you add in all of the variables.

I hardly think of my family as urban homesteaders anymore, because the parts of the lifestyle that once seemed foreign and daunting, such as gardening, composting, and cooking from scratch, are now routine. They help us stay connected and make our lives feel richer. It’s powerful to produce some of what we need to survive, especially food.

Growing Cycle

7 Reasons to Join the Urban Homesteading Revolution

Copy and paste to embed in your website:

Author information

Abby Quillen

Abby Quillen

Abby Quillen is the author of the novel The Garden of Dead Dreams and the editor of two anthologies. Her articles and essays have appeared in YES! Magazine and The Christian Science Monitor and on Common Dreams, Nation of Change, Reader Supported News, The Daily Good, Truthout, and Shareable. She lives in Eugene, Oregon, with her family. When she’s not writing, she grows vegetables and weeds, bikes and walks as much as she can, and jots down cute things her kids say.

The post 7 Reasons to Join the Urban Homesteading Revolution appeared first on Made by CustomMade.

How to Build Your Own Terrarium

$
0
0

How to Build Your Own Terrarium: A Black Thumb Guide to Life in a Bottle

A Black Thumb Guide to Life in a Bottle

Terrariums are like tiny fantasylands, chock full of miniature plants and itty-bitty art. But before you get started creating your very own eco universe, make sure you have the right materials and plan so your terrarium will thrive for years to come.

Why It’s Time to Consider a Terrarium

It’s Cool

Let’s face it—having a tiny ecosystem in your own home is really, really cool. Terrarium-dwelling organisms depend on you for light, water, and air—and contingent on your care, they can flourish or despair. This guide helps make sure your itty-bitty terrarium world thrives.

It Can Reduce Stress

Stress is a sneaky and prevalent assassin in American society. Chronic stress has been linked to heart disease, insomnia, eating disorders, and other illnesses, but reducing daily stress levels isn’t always easy. Thankfully, terrariums can help. Studies increasingly demonstrate the act of nurturing plants gives people a way to cope with negative feelings by directing them toward something positive. In fact, merely looking at plants may reduce blood pressure, leading to higher quality of life.

It’s Low Maintenance

How many of us have inadvertently killed a houseplant? Whether it was too much or too little, most people have been guilty of phytocide at some point in time. The terrarium is a low-maintenance way to bring some green into your dwelling without the high water demand, messy pots, or the alternative litter box for your cat. Mind you, low maintenance does not mean no maintenance. The maintenance-free alternative would be plastic plants, which is just tacky.

It’s Art

Clearly, a well-designed terrarium is a beautiful item to feature in your home. It’s worth taking a moment to contemplate and admire, and unlike a painting, it is never static. The organisms are growing, blooming, fruiting, and keeping the life cycle going for all to see. There is nothing boring about a terrarium. And as all good art does, a terrarium provokes thought and inspiration.

Think Like a Plant: A Guide to Terrarium Care

Picking the Right Plants for Your TerrariumThis guide aims to help you make better choices when building your terrarium so it will thrive during its lifespan. To do this, it’s crucial to step outside of the animal kingdom and think like a plant. Terrariums need light, water, carbon dioxide, nutrients, and proper climate. Based on these conditions, they have evolved in fantastic ways, since they are unable to move to another location when the elements become undesirable. Observing the shape of a plant may tell you a lot about the conditions in which that species evolved.

Water and light are two major limiting factors when it comes to plant survival. In a desert, the physical conditions yield an abundance of light and lack of water. To minimize water loss through their porous “skin,” xerophytes (plants adapted for low-water environments) will reduce the amount of surface area exposed to the atmosphere. Thus, the more sphere-shaped a plant is, the more water it will retain, thereby reducing its risk of drying out.

In a jungle, however, plants are faced with the opposite problem: abundance of water and limited sunlight. Massive trees shade out the understory vegetation, leaving plants competing for light. Many tropical plants will exhibit an increased surface area to maximize light absorption, since water is readily available from humid conditions.

These morphological features provide a peek into proper species selection for your terrarium. Consider how a plant evolved and then choose its friends that may have evolved under similar pressures. If you select plants that have evolved with opposing limiting factors, then one or both species will surely wane as you struggle to keep everyone happy.

Plant Selection

The most common plants in terrariums are air plants, houseplants, and cacti. Air plants and houseplants work beautifully for terrariums, but cacti will suffer a long, arduous death.

Air plants

The genus Tillandsia is the most commonly used air plant in terrariums and provides an impressive diversity of species. The plant collects water and nutrients from the air, so the leaves double as roots, which says a lot about the climate in which these plant evolved (humid!). That utilization of the air makes these excellent as plants for the terrarium environment.

Lighting and temperature are key factors that will influence where the terrarium will live in your house. Air plants enjoy bright, indirect sunlight. If you plan to have it in a darker space—say, built into your desktop or bookcase—you will need supplemental grow lamps. This is where your economical terrarium gets pricier, but is bound to impress.

Air plants thrive at around 50 degrees and up. Some species are hardier than others, so if you live in a cold climate, you should read up on which Tillandsia will work best for you. Air plants require a 20- to 30-minute soak one to three times a week, depending on how dry your climate is. It is important to let your Tillandsia dry out between soakings before placing it back into the terrarium. It can be given supplemental misting with a spray bottle in between water baths if needed. Keep an eye out for mold or algal growth, which indicates the environment is too wet.

Rooted Plants

If you decide to put rooted plants in your terrarium, there are two points to remember. First, select a plant that will handle humid conditions and a lack of drainage. Second, realize a rooted plant needs soil and will require some maintenance.

The walled vessel of a terrarium increases the humidity, so there is no need to water heavily or often. If the glass accumulates condensation, then that is a good indicator humidity levels are where you want them. If algae start to grow or pooling water is apparent, then the system has too much water and needs to air out.

Drainage Doctor: When to Pull the Plug on Terrarium WateringCacti

Cacti are notoriously hardy plants adapted for wind, drought, flash floods, and intense direct sunlight. These conditions are difficult to emulate in a jar, which is why they don’t have long-term success in a terrarium. Initially, they look chipper, but over the test of time, they suffer.

The classic terrarium will have glass walls that block air circulation, which is a rotting death sentence for cacti and many succulents. When placed in the cacti’s required full sun, light that penetrates the terrarium glass creates oven-like conditions that put your plants on slow cook. If an open-air vessel with low walls is used, the water drainage issue remains. A properly watered cactus requires a “flash flood” method, with heavy watering every three or four weeks and dry soil in between. Terrariums, by design, hold water in the soil, leading to rot.

Terrarium Assembly

Choose a substrate

The choice of substrate you select depends on the plants you use. If you are using air plants, remember their root structures are used for anchorage rather than water transport, so avoid placing them directly onto soil. It is best to let air plants sit on gravel, sea glass, rusty bolts, or whatever pleases you. If your air plant has rooted plant neighbors, anchor it to something like a piece of driftwood to keep it off the moist substrate.

If your plants have functional roots, they need soil. You can get creative with your layer materials. Rooted plant terrariums—from the base and up—generally consist of a drainage layer, soil barrier, and growing medium.

Layering MaterialsDrainage layer

Start with gravel at the base. For a petite vessel, use a smaller diameter material like aquarium gravel, and for larger containers use pea gravel.

Place a layer of activated carbon (a.k.a. horticultural charcoal) on top of your gravel layer. It will help absorb decomposition odors and keep your terrarium fresh. Be sure to dampen before adding to the container; otherwise charcoal dust will cling to the glass.

The drainage layer should constitute three quarters gravel and one quarter activated carbon. The gravel and the odor reducer should measure about half the depth of your growing medium layer.

Soil barrier

This prevents the soil from washing into the drainage layer. You can use fine-grade plastic screens, nylon stockings, or any non-compostable material that will allow water percolation and prevent soil particles from passing through.

Growing medium

A good growing medium consists of about two parts sandy potting soil, one part peat moss, and one part perlite. Before adding your potting soil, it should be moist but not soaked. When you give a handful of soil a squeeze, no water should trickle out.

The total depth of the soil mix and drainage material should be no more than one quarter the depth of the container. Place the growing medium on top of the soil barrier and you are ready to plant. The soil can be contoured with pieces of rock or other scavenged goods to create the desired landscape.

Create a universe

Now that you have your vessel, substrate, and compatible plant species, it is time to assemble your universe. The tricky part of planting a terrarium is to minimize the mess. Because the vessel’s opening is generally narrow, it is useful to have some tools for the job. Fortunately, you can use common household items.

Terrarium Building ToolsMake sure to clean the vessel before planting. When you are ready to plant, be rigorous with your plant inspection—check for diseased tissues or hitchhiking insects. Place the large specimens in first and then fill in with smaller ones. After planting, place a layer of sphagnum moss over the soil to create a splashguard during watering. It also creates a less cultivated appearance.

Use only distilled water in your terrarium so calcification deposits from tap water do not build up.

There you have it: an attractive, stress-reducing, low-maintenance ecosystem in a jar! With the proper care, you and your terrarium will be friends for many years to come.

How to Build Your Own Terrarium: A Black Thumb Guide to Life in a Bottle

Copy and paste to embed in your website:

Author information

Danielle Castle

Danielle Castle

Danielle started as a field biologist in 2005. She has worked with conservation research projects involving the Caspian tern, northern spotted owl, and red-crested cardinal in North and South America. She served as a biological consultant conducting botanical inventory, nesting bird surveys, rare species surveys, and habitat restoration. Danielle earned a Bachelor of Science in Ecology and Systematic Biology, and a Master of City and Regional Planning with an emphasis on environmental planning from California Polytechnic State University, San Luis Obispo. Writing about curiosities provides her with the intellectual intrigue similar to that of poking at stuff with a stick. Whatever the topic, if you give it a little nudge, you never know what surprises it may reveal.

The post How to Build Your Own Terrarium appeared first on Made by CustomMade.

The Power of Printing

$
0
0

The Power of Printing: 3D Printing Technology for the Modern Crafts Movement

3D Printing for the Modern Crafts Movement

In the 1980s, most tech geeks were still busting their brains over how to develop personal computers and entertainment consoles for the masses. Little did the public know that in addition to the green MS-DOS screens and 8-bit video games entering the market, three decades later developments taking place behind the scenes would revolutionize the worlds of industry, craft, and art.

3D Printing’s Bulky Beginnings

In 1984, a man named Chuck Hull of 3D Systems Corporation invented the basis for 3D printing software. It had the ability for users to design objects on a computer and digitally “slice” them into extremely thin layers. This STL file format allowed special printers to produce three-dimensional objects by depositing sheets of photopolymers, hardened with the help of UV lasers, one pass at a time. Soon, these “additive manufacturing” robots were able to work with metal, and by 1990 plastic feedstock was introduced by Stratasys under the name of fused deposition modeling (FDM). By the mid-1990s, the Z Corporation helped coin the term “3D printing” with its MIT-developed deposition method, which used inkjet printer heads to lay down liquids on powder bases.

Most 3D printing technology remained hidden within the labs of large manufacturing operations for years and out of public use largely due to giant price tags, massive size, and length of time needed to produce an item. It was not until the 2010s that additive manufacturing became more widespread. Due to 3D printers’ increased popularity in the engineering, aerospace, and metalworking industries, the cost of equipment began to drop. Businesses seeking alternatives to injection molding fabrication or looking at new ways to quickly prototype items from architectural models to car parts began to look to 3D printers as efficient, time-saving machines.

Like the room-sized computers that preceded them, many modern 3D printers have shrunk in size and price, becoming more accessible to the everyday hobbyist and entrepreneur. For the true DIYer, open-source projects such as RepRap allow hackers to build their own machines using filament to print in materials such as plastic and metal. Models small enough to fit on a desktop, such as the popular MakerBot, run just several thousand dollars and are ready to use out of the box. While still somewhat expensive for the average consumer, communal Makerspaces and collectives have popped up over the last couple decades to pool funds and share the cost of equipment. Companies that specialize in 3D printing, such as Shapeways, accept files from individuals or small businesses and ship the finished product without the need to buy a printer at all.

How it’s Done: Methods for 3D Printing

Establishing the primary STL file can be challenging for those not familiar with coding or CAD design programs. Luckily, there are generous and talented people who spend their time creating files available for download (for example, with programs like Rhinoceros). Many of these kind souls make their designs open-source and free for public use. 3D scanners, like the MakerBot Digitizer, can turn small, real-world objects into files with the help of lasers that convert hundreds of thousands of reference points into digital information.

Fused Deposition Modeling

One of the many widely used techniques for 3D printing is Fused Deposition Modeling (FDM), which uses plastic or other materials like rubber or clay to add layers that harden the moment they leave the printer nozzle.

Fused Deposition ModelingElectron Beam Freeform Fabrication

Electron Beam Freeform Fabrication (EBF) takes advantage of metal wire and electron beams in a vacuum environment. Developed by NASA, the technology forms net-like structures from a molten pool of metal that is fed wire and treated with electron beams. NASA hopes this EBF will some day become a viable means to print in zero gravity.

Electron Beam Freeform FabricationLaminated Object Manufacturing

Laminated Object Manufacturing (LOM) uses layers of adhesive-coated materials including paper and foil. Sheets are added to a substrate with a heated roller and laser-cut to specification. Once waste material is removed, each slice is glued together.

Laminated Object ManufacturingPlaster Printing

Plaster Printing (PP) operates much like an inkjet printer using powder such as gypsum plaster and a liquid binder released from a nozzle to produce layers and then stick them together. This type of printing usually needs some sort of hardener during the finishing phase to add structural integrity.

Plaster PrintingStereolithography/ Digital Light Processing

Stereolithography (SLA) and Digital Light Processing (DLP) apply polymers as their feedstock, which later harden once exposed to light.

Stereolithography/ Digital Light ProcessingDirect Metal Laser Sintering/ Selective Laser Sintering/ Electron Beam Melting/ Selective Laser Melting

Direct Metal Laser Sintering (DMLS), Selective Laser Sintering (SLS), Selective Heat Sintering (SHS), Electron Beam Melting (EBM), and Selective Laser Melting (SLM) all use some sort of grain or powder and high-powered lasers to fuse layers together once deposited.

Direct Metal Laser Sintering/ Selective Laser Sintering/ Electron Beam Melting/ Selective Laser Melting

The range of filaments these machines use has expanded from the original thermoplastics to metal alloys, wood, resin, consumables like sugar or chocolate, and even human cells. Most off-the-shelf desktop printers use PLA or ABS filament that is available in a variety of colors. Although many of these plastic-like polymers may not be the most environmentally friendly choices considering their inability to biodegrade, there are companies formulating materials derived from corn, and those that avoid toxic BPA or phthalates. Most filaments arrive in spools of wire with varying diameters and different melting points, so a little research is necessary to find just the right type to accommodate a printer for each project. For a mini-recycling factory at home, diehard repurposers can make a RecycleBot from open-source info or buy a Filabot, which crunches up old plastic milk jugs and bottles and transforms them into filament for projects.

The Third Dimension: The Advantages and Disadvantages to Printing in 3D

Like any human invention, 3D printing technology possesses both positive and negative consequences for the environment and economy. By forming items through an additive process, less material is wasted than when carving whole blocks of virgin stock. When biodegradable or upcycled components are employed as bases, trash becomes art, and surplus crops, including corn or wood pulp, find new lives as industrial textiles. Printing limited runs of items avoids glutting markets with superfluous junk that may linger at the back of stores or end up in landfills. Recreating a broken component from a printed digital file encourages repairing appliances instead of ditching the entire contraption and buying a cheap replacement. Philanthropic organizations such as iLab print essential medical supplies and tools in Haiti and have the potential to bring vital technology to areas previously devoid of necessary manufacturing or delivery infrastructure.

On the financial side of the equation, rapid prototyping cuts down on the time required to build and test models, saving businesses of every size from breaking the bank during research and development phases.

CustomMade artist and jeweler Paul Klecka values the efficiency factor of 3D printing. “I’ve carved thousands of models by hand over the years, but there is zero flexibility to edit the design once carved,” he says. “The digital process allows me to save each file, and I save a project perhaps 30 times during the process. This way I can go back and make adjustments or even rebuild the design elements for another client. The time saved is valued by myself as well as my customer.”

3D Printed Ring

The simple 18K bezel and heavily detailed organic pattern on the ring shank required separate printing, orienting each in different directions. The shank needed careful placement in the 3D build to minimize grow lines in recessed areas

Fellow designer Kyle Squillace of Impressive Prototypes leans on 3D printing technology at the beginning stages of his work. “The printer makes it easier to have a physical, tangible prototype at an early stage rather than at the end when all this time and money has been put into an unproven design that was intangible,” he says. “Bringing the physical prototype into play earlier in the development process will identify shortcomings sooner.  Early mistakes are much more manageable than those in the late stages. It may take several iterations of a design before settling on a finished product. Those handmade, labor-intensive prototypes are usually much more costly to cast aside than an item built by the 3D printer.”

3D Printed Glasses

The design for these frames was 3D printed in separate components then prepped, primed, and painted before assembling.

The success of makerspaces has been supported in large part by the invention of tools like 3D printers. Even so, most traditional fabricators are unaware of the progress being made in the additive manufacturing world. Consumers can now collaborate with a professional artist instead of going solo for a variety of reasons.

“3D printing is still a new concept to the mass market but we’ve been around it for more than 20 years on the commercial side, so we have the experience and expertise needed for utilizing the printer’s capabilities,” Squillace says. “It also takes a significant investment for most consumer budgets, as well as the time to learn about the materials, process, and post processing. If someone is printing infrequently, it may not make sense to put the investment into a quality machine of their own.”

“In the case of jewelry, my 30 years of bench experience is hugely valuable,” adds Klecka. “If you sat at my desk using my software you might be able to design something—but would it be able to be printed, cast, wearable, and functional? Would the shank, walls, and prongs be the right dimensions? Would the gemstones stay in? Probably not. 3D printing allows me to design things that would be impossible to do by hand.”

The Perils and Possibilities of 3D Printing for the Future

The Pros and Cons of Printing in 3D
Both Klecka and Squillace recognize that while 3D printing is continuing to make headway, the technology still has a long way to go, particularly in the arena of feedstock material for high-end work.

“Print speed, material offering—metals in particular, ease of use, and cost are all areas in the field that are being improved and developed further due to feedback from customers,” Squillace says. “All of these will need to be greatly improved to truly make the 3D printer a mass market product like the inkjet printer has been for many years,” he says.

However, just because it is possible to print a fancy paperweight or personalized knickknack does not mean it’s necessary. 3D printers have the potential to shift the center of production to individuals and there is no guarantee every artist or tinkerer will follow the ethos of sustainability. The temptation to spit out millions of objects can be overwhelming. As Klecka observes: “How could you not love a machine that turns your digital dreams into reality!”

Even those who favor downloading over designing could get carried away with printing garages and closets full of what they want, without regard to where their newly-minted creations end up once they lose their luster. Consumers and artists alike must remain aware that although the shape and length of the supply chain changes with the addition of a 3D printer, the finished product will always need to find a final resting place—be it returning safely to the earth in the form of biodegradable polymers or sticking around forever as a petroleum-derived plastic.

As printers and their components become more mainstream and newer, flashier models hit the market, they face the same disposability perils as electronic mobile devices and appliances. Yet as long as the additive manufacturing movement keeps the environment in mind, it is exciting to see what the future holds for a machine that can bring anything from human organs to entire houses into existence with the speed, accuracy, and precision of a robot.

The Power of Printing: 3D Printing Technology for the Modern Crafts Movement

Copy and paste to embed in your website:

Author information

CustomMade

CustomMade

CustomMade is an online marketplace connecting customers who want one-of-a-kind creations with professional and passionate makers of those goods.

The post The Power of Printing appeared first on Made by CustomMade.

Put Down the Plastic

$
0
0

How to Move Away from Plastic Dependency

Since plastics were first introduced to the U.S. during the mid-late 19th century, we’ve been dependent on the material for it’s versatility, convenience, and function. Currently, plastics are one of the most used materials on a volume basis in U.S. industrial and commercial life. Unfortunately, the sheer mass of plastic used to make containers, packaging, appliances, plates, cups, and so forth has gravely impacted the environment. An estimated 46,000 pieces of plastic occupy each square mile of ocean and at least two thirds of the world’s fish stocks are suffering from plastic ingestion.

Alternative materials—such as reclaimed wood, steel, and glass—can help gradually reduce our reliance on plastic and pose less of an impact on the Earth. Reducing plastic use can range from short term decisions—swapping plastic sandwich bags for washable canvas or throwaway plastic utensils for metal ones—to more long term changes, such as trading in your plastic picnic tables for reclaimed wood barn tables. Making smart swaps can make a big difference over time.

How to Move Away from Plastic Dependency Infographic

Copy and paste to embed in your website:

Author information

CustomMade

CustomMade

CustomMade is an online marketplace connecting customers who want one-of-a-kind creations with professional and passionate makers of those goods.

The post Put Down the Plastic appeared first on Made by CustomMade.

Greenhouse Dreams

$
0
0

Greenhouse Dreams: Peppers in December

Peppers in December

A home garden greenhouse may seem like a daunting item on a gardener’s wish list. It comes in the form of a pipe dream or is shuffled into the “one of these days” category.

Greenhouse dreams typically resurface when coming home from a weekend adventure to find freshly emerged seedlings on their deathbeds. Sometimes they can be coaxed back to life and other times they are beyond revival, but these young phyto-children could have been saved with a simple DIY greenhouse.

A greenhouse provides plants with a head start by sheltering them from whatever the weather is up to outside. Greenhouse gardeners can sow seeds weeks before the topsoil is warm enough for outdoor germination. And late-season producers can keep fruiting beyond their outdoor counterparts. With a temperature-controlled environment, a wider variety of species, which would otherwise be intolerant of the climate on site, are available. In addition to supreme growing conditions, herbivory and parasites are less of an issue in a greenhouse, since neighborhood deer or a swarm of locusts can’t get to the protected plants.

When plants are safely inside, frost, windy conditions, pesky rabbits (and everything in between) no longer pose threats. It’s almost like cheating—except when you’re winning, who cares?

Greenhouse Success: The Basic Requirements

A greenhouse is a climate control box for your plants. You can get as simple or as fancy as you’d like, depending on how much you’re willing to spend. This guide will focus on the bare bones method of taking it from foundation to a permanent structure, and then explore some of the many available greenhouse styles.

A greenhouse should have:

  • Proper location
  • Ventilation
  • Air circulation
  • Watering system
  • Temperature control

Location

The location of your greenhouse determines your plants’ success. Do your best to position the greenhouse where it will receive morning sun during the summer and winter months. Afternoon sunlight can be intense on its own, but in a greenhouse the light may be magnified by the glass and in turn burn plants. The ideal effective shading includes deciduous trees to the west to provide dappled shade in the intense summer months, and winter sunlight when the trees drop their leaves. If the ideal shading is unavailable, use an opaque roofing material to help disperse sunlight.

Ventilation

Ventilation provides gas exchange. Plants inhale the carbon dioxide we exhale, and exhale the oxygen we inhale, so provide openings in the house to facilitate these exchanges. Natural ventilation is easy to accomplish with side vents and roof openings at the highest point in the structure. This takes advantage of convection currents, where heated air rises through the top and pulls cool air in through the sides. (This is the same mechanism that explains wind currents on Earth.)

Shoot the Breeze: How to Ventilate Your Greenhouse

Circulation

Air circulation keeps the gases moving throughout your climate box. Proper circulation helps maintain a consistent temperature throughout the greenhouse; otherwise cool air sits at the bottom near the plants and warm air is trapped at the top of the structure. The best way to mix it up is to install small fans at opposite ends of your greenhouse to create an oval pattern of air circulation.

Irrigation

Plant watering depends on the habits of the overseer. Hand watering crops works well if you are available on demand. However, it only takes a warm weekend of slacking off to put plants under water-stressed conditions. Automatic watering systems, on the other hand, are a plant saver. Whatever plants’ needs are, there is a watering system to meet those requirements.

There are two basic types of watering systems that control the frequency of your watering schedule. One is an automatic timer that turns the water on at a pre-programmed time and duration. The other system is controlled by evaporation sensors that determine when greenhouse conditions are too dry. Water emitters come in all shapes and sizes, from misters to drip, soakers and fog. Whatever conditions plants require, there are watering systems available to emulate everything from an equatorial rainforest or a red rock desert.

Temperature control

All plants have temperature requirements, and if conditions become too warm or cool, they will suffer. A Los Angeles greenhouse in February has much different requirements than the same greenhouse in Denver. Depending on the climate and the parameters of a greenhouse, a heating or cooling system may be beneficial. Your local garden experts can provide more info on this.

Structures

Building an affordable greenhouse is pretty doable when it comes to upcycling materials. Cleaning out the garage, dumpster diving the neighborhood, scouring the free section on Craigslist, or visiting the local re-store will reveal the materials available right under our noses.

Prepare the foundation

You will need:

  • Flat head shovel, rake
  • Pressure-treated boards for base frame
  • Landscape fabric
  • Landscape staples
  • Heavy duty staples
  • Pea gravel

Step 1: Determine the location. Create a flat, level surface for your greenhouse. Remove rocks, plants, barbed wire, and other debris from the area. A flathead shovel and rake is typically sufficient.

Step 2: Install a four-inch ABS pipe that allows you to run water or electrical lines from the exterior, underground into the greenhouse. The black ABS used for sewer lines is cheaper than white PVC. Temporarily seal the ends of the pipe to prevent soil from entering. (Duct tape works well for this.)

Step 3: Build a frame at the perimeter of the greenhouse area to hold gravel for drainage. Frame material should be made of something rot-resistant, such as pressure-treated wood.

Step 4: Line the area with polypropylene landscape fabric to suppress weeds. Staple the edges to the frame so the silt fencing does not slip and weeds do not grow in between the frame and the base material. Landscape staples can be used to hold the fabric in place. Fill this area with two to three inches of pea gravel for drainage.

You now have a naturally draining foundation!

Building Your Greenhouse Base: The Foundation

The house

Your greenhouse design can be as creative or utilitarian as you choose.

The upcycled window greenhouse is a permanent structure that puts old windows and doors to good use. The basic idea is to build a sturdy frame and attach windows. Remember to account for the fan, side vents, and roof vent in your design to accommodate ventilation and air circulation. Also, check with your local building codes, which vary from town to town.

Greenhouse Dreams: Peppers in December

Hoop houses are a quick and easy way to protect your plants from the elements. They can take the form of a low-laying tunnel or a large walk-in structure. The hoop house has the benefit of being semi-portable and easy to set up from readily available materials. But using a hoop house means the plastic material has a shorter life span, temperatures are difficult to maintain, and there’s no support for snow. Hoop houses are handy for early-season frost protection as they warm the soil sooner to provide a head start on crop production. (Check out the Natural Resource Conservation Service’s building plan for a simple ground level hoop house design here.)

Greenhouse Dreams: Peppers in December

Funky yet functional

Feel like thinking outside the box? People have built greenhouses out of 2-liter plastic bottles and geodesic domes, and even created structures heated by chicken coops. There are no structural boundaries to what you can grow your plants in as long as you rely on five principles: location, ventilation, air circulation, irrigation, and temperature control.

Out of the Box Greenhouse

Whichever greenhouse ends up in your yard, it’s hard to regret checking this item off your “someday-maybe” to-do list. Knowing plants are protected from the elements while you are away is worth the time and effort put toward your DIY greenhouse. Impress your friends with freshly harvested arugula and spinach salads during the holidays. Go ahead and make the neighbors jealous of your red peppers in December. Remove the barriers from weather-confined gardening to year-round greenhouse growing.

Greenhouse Dreams: Peppers in December

Copy and paste to embed in your website:

Author information

Danielle Castle

Danielle Castle

Danielle started as a field biologist in 2005. She has worked with conservation research projects involving the Caspian tern, northern spotted owl, and red-crested cardinal in North and South America. She served as a biological consultant conducting botanical inventory, nesting bird surveys, rare species surveys, and habitat restoration. Danielle earned a Bachelor of Science in Ecology and Systematic Biology, and a Master of City and Regional Planning with an emphasis on environmental planning from California Polytechnic State University, San Luis Obispo. Writing about curiosities provides her with the intellectual intrigue similar to that of poking at stuff with a stick. Whatever the topic, if you give it a little nudge, you never know what surprises it may reveal.

The post Greenhouse Dreams appeared first on Made by CustomMade.

Hunkering Down in a Yurt

$
0
0

Hunkering Down in a Yurt: Down-Sized Living in a Modern Age

Down-Sized Living in a Modern Age

In the summer of 1999 I suddenly found myself without a job or home. With a partner and newborn—and plenty of crazy ideas common to twenty-somethings—I decided to build a yurt and embark on homesteading in my native New Hampshire. Fifteen years later, I’ve learned most crazy ideas don’t work, but yurts are among the ones that work for me. I now build for folks full-time, primarily year-round yurts for other twenty-somethings starting out on similar paths. But I also construct lighter three-season yurts and ones used for studios, guest quarters, getaways, apprentice housing, and camping.

Yurt Life: Rustic Comfort

There are many ways people live in yurts. Some commute to real jobs every day. Others escape to the yurt for a few weeks in the summer, or turn to a backyard yurt for a few nights a week. For me, yurt living with four people (two of them quite young) meant day and night, summer and winter. That’s not to say we spent 24 hours a day within the bounds of a 20-foot circle. The yurt became just one of the rooms in our “house”—the others included the barnyard, shop, field, and woods. The yurt was simply the room we knew was always warm, dry, bug-free, and lit at night. Whether the yurt created my way of life or the other way round, I’ve never quite figured it out.

Yurt living and homesteading in general is profoundly place-specific. Despite its origins in central Asia—an area with dry climate and flat unforested steppes—a yurt works relatively well in rural New England. By comparison, the tipi is harder to heat in winter because the high cone funnels heat out and lets the rain in. Wigwams and earth lodges are a bit rustic even for those of us willing to rough it. Camper trailers leave something to be desired in the “soul” department. A yurt, on the other hand, is nice enough to spend a few years in while creating a forever home, but not so comfy that the house never gets completed.

Heating: Or How Not to Freeze

The first question I’m always asked is, “How do you stay warm in New Hampshire winters?” Answer: In a T-shirt with an airtight woodstove and two to three cords of dry firewood. In a 20-foot yurt (the size I know best), you’re never more than seven or so feet from the central stove. Putting the stove in the center heats the yurt evenly, creates the feeling of a larger space, and serves as the center of yurt life, providing warmth and food for more than half the year. As long as it’s airtight, a lightweight sheet steel stove is better than a more expensive fancy one with lots of thermal mass. Some of the best are the Tempwood stoves (made in Massachusetts but most easily found on Craigslist) and Four Dog stoves in Minnesota. A stove should heat up the yurt quickly when getting home at the end of a cold day. No one wants to wait around for hours shivering in boots and a coat.

Wood Heat on the Rise

When the yurt is up to your desired temperature, let the fire slowly purr along day and night. You’re heating air (not mass) and there is very little of that in a yurt. Heating thousands of cubic feet of space is entirely different than heating the tens of thousands of cubic feet commonly found in a typical American house. R-value, a measure of heat loss due to conduction, becomes relatively less important. And heat loss due to convection, as well as heat gain radiating from your woodstove, become key. After an April 2007 windstorm took the insulation off my yurt (note from experience: don’t ignore a loose flapping yurt panel for months on end) I spent the next year and half with no insulation. I noticed no difference in keeping the yurt warm. With a slow fire burning—hence the need for dry firewood, no creosote—and any drafts blocked up, I was toasty all winter. The first serious snowfall (around Christmas most years around here) adds additional natural insulation. By raking the snow off the roof before it melts, we create a warm layer of insulation all around the base of the yurt.

While there certainly are other types of fuel, I’ve never heard of anyone living through the winter here with anything other than a woodburning stove. Firewood is free, abundant, and simple—it’s the yurt dweller’s permacultural ideal.

Plumbing: Bringing the Water Inside and Taking Care of Business Outside

So where do you go to the bathroom in a yurt? For us, the answer is in the humanure outhouse. Here’s a tip: Build it a little bigger than necessary (say, 6 feet by 8 feet) and it’ll become your attic, garage, and cellar, since the yurt lacks these. For more information on outhouses and composting poop, check out the Humanure Handbook by Joe Jenkins.

Forget the Flush: DIY Compost Toilets

If heat and bathrooms are easy, the water question is anything but. Creating a system to deliver running hot water any time of day or year is the holy grail of the New England homestead system. Creating one that doesn’t freeze, leak, or get chewed through by beavers (please don’t ask) is even better. My answer is: Don’t create one, create two. In the summer, water stores easily. In the winter it is easily heated on the constantly-burning stove, but it will freeze if left out. I’m sure I’ve tried dozens of water systems and they all have pros and cons. Hauling buckets by yoke, sled, cart, car, or hand from springs, ponds, or the neighbor’s bathtub is simple. It does, however, get old (especially when washing cloth diapers by hand). Rainwater catchement systems off the yurt roof can provide lots of water (in summer, of course) for the dirty diaper task, but the water is too full of tree tannins and acid rain to drink or cook with. A garden hose run from a neighborhood spigot will work half of the year. It can even be hooked up to a sink in the yurt or an outdoor kitchen. Just remember to transition to your winter system before the first hard frost and don’t run the pipe through any beaver ponds.

Water regulations vary state by state. In New Hampshire, if the water is moving on its own accord into the yurt, a septic system and leach field are necessary. Beyond the question of wasting fertility (dishwater is full of phosphates that plants love) and giving possible pathogens a vector to spread in a giant tank of potable water, septic systems are very costly (more than the entire yurt). Plus, the look of a big sand mound just to accept the drinking water you’re polluting may not be worth it. Connect a pipe from the bottom of your dry sink, out the bottom of the yurt at the side, and into a patch of weeds or mulch. Don’t include a trap anywhere because it will freeze in winter and isn’t necessary.

Electricity: Amping Up the Yurt (Just a Little)

All the important needs—except refrigeration—can be accomplished with a tiny photovoltaic system or a very long extension cord. You can run a low amperage system hundreds of yards with very tiny wire if you start with this useful tidbit: Voltage drop is proportional to distance run. The traditional yurt refrigerator is the styrofoam cooler with half-gallon plastic jugs of ice swapped out every other day into the neighbor’s chest freezer. The next step up is a propane fridge. Running a small, energy efficient DC fridge (powered by solar) requires a medium-sized photovoltaic system, which is no small cost.

Building: Making Your Yurt 

Making Your Yurt

The Frame

Most yurt frames are built from sawn wood. When I created my first yurt I couldn’t afford to buy lumber, but had a small axe and access to a woodlot. I set out to craft the rafters and lattice wall from small-diameter saplings, which I continue to do to this day. The wiggly unmilled wood makes each yurt unique. Because the local hardwoods I use are very strong, I don’t have to reinforce my frames for snow.

Typically, a year-round yurt is set on a wooden platform. This platform does not need to be built on a frost-proof foundation. If there is not too much of a slope, it can be set on blocks, which rest directly on the ground. My favorite way to build the substructure of carry beams and joists is with green rough-sawn Eastern hemlock from a local sawmill. It is natural, renewable, plentiful (therefore inexpensive), super strong, and moderately rot-proof. Kept eight to twelve inches off the ground, not over a wet area, and it will last for decades. Pressure-treated wood is a more conventional way to go, but it fails the local and natural tests for me. Kiln-dried lumber fails most of my criteria as well.

The Floor

A yurt floor can be built beautifully from reclaimed wood. If one-inch boards are put down two layers thick over joists placed every two feet, the floor will be plenty strong and stiff. Installing a quarter-inch layer of foil-faced bubblewrap type insulation—or even just some 4-mil poly—in between layers will keep out the draft. Personally, I like 2×6 tongue-and-groove for strength and airtightness in a single layer. With regard to insulation, the key is to stop drafts from coming through the floor. Heat rises, so put more energy into insulating above you than below. One last thing: Don’t build the floor bigger than the circle of the yurt, or you’ll be looking at indoor rivulets every time it rains.

The Roof and Cover

In an ideal world, I’d always build yurts out of natural, local, ethical, nontoxic, low-carbon footprinted, renewable, long-lasting, beautiful, inexpensive, and functional materials. For the cover, functionality means keeping out weather, keeping in heat, resisting UV breakdown, and resisting flame. To get all these qualities is impossible, so I compromise. While slate makes just about the perfect roof, there goes the portability factor. Canvas is probably the most natural, beautiful, inexpensive yurt material, but it fails most of the other criteria. Even treated to resist UV, mildew, moisture, and flame, canvas will begin to deteriorate after three years if left up year-round. In New England, vinyl is a better option in many ways, and will last 10 to 20 years depending on the type. Some yurts are covered with used or unprinted billboard vinyl, which is fairly inexpensive and watertight for roughly five years if not moved in the cold (it cracks) or exposed to sparks (it burns). The final consideration for a cover is breathability. Canvas breathes and so do some woven vinyls, but most laminated fabrics do not. So long as you don’t pair a non-breathable outer cover with a breathable inner layer, you won’t have to contend with condensation.

Rules and Regulations: Building to Code

While water regulations tend to be statewide, building codes are usually enforced town-by-town. Codes may cover size restrictions, insulation, roof strength, fire rating, wind loads, and many more areas. Each yurt owner’s experience getting a structure permitted can vary widely. The good news is few municipalities tax temporary portable structures, including yurts. The bad news is that most building inspectors have never even heard of one. For a thorough discussion on yurts and building codes, check out the late Becky Kemery’s site, YurtInfo.org.

Life After the Yurt

After nine years of yurt living I was ready to move into a house. Fitting square furniture into a round space is a geometrical challenge. But, I miss hearing the skeins of geese migrate by starlight. And now that we’re in a house, the coyotes can break in to the chicken coop at night without me hearing a thing.

Hunkering Down in a Yurt: Down-Sized Living in a Modern Age

Copy and paste to embed in your website:

Author information

Ken Gagnon

Ken Gagnon

Ken Gagnon lives and homesteads on fifty acres in rural southwest New Hampshire. He lived in one of his yurts for nine years. When not otherwise making music or art, he and his friends build places that feel nice to be in. His yurts are all framed with round saplings from the forest, hand built and sewn on his homestead, and delivered and set up by him around northern New England. To learn more about his yurts and timberframes, or what happens at Two Girls (they’re his daughters, for the record, one of whom was born in a yurt) Farm, check out twogirlsfarm.org.

The post Hunkering Down in a Yurt appeared first on Made by CustomMade.

DIY Playgrounds

$
0
0

DIY Playgrounds: A Healthier Way to Take the Structure Out of Play

A Healthier Way to Take the Structure Out of Play

Back in the day, it seemed like the biggest hazard on a playground was a metal slide on a hot summer day. But as it turns out, many conventional playgrounds pose potential health risks to the people who play on them, with consequences much more serious than a mild burn (and we’re not talking about falling off the monkey bars).

The artificial surfaces now common on playgrounds are home to some pretty scary toxic contaminants, which is just one of the reasons some people are turning to homemade playground alternatives. Do-it-yourself playgrounds allow people to choose how a structure is made—and what it’s made with—and also help make play accessible to people from all walks of life. Read on to learn why it may be worth your time to join the DIY playground trend and how to get in on the action.

What’s the Matter with Modern Playgrounds?


Toxic Playtime

Since the 1960s, more and more playgrounds have utilized artificial surfaces. Today, artificial turf is used on approximately 4,500 playgrounds, tracks, and fields in the U.S. Millions of scrap rubber tires are ground up for use as a surface material on playgrounds. These materials, in addition to other substances commonly found on modern playgrounds, may contain toxic contaminants that pose human health risks. Potential hazards on modern playgrounds include:

  • Arsenic: Prior to 2004, wood designated for outdoor uses—including playground equipment and wood chip surfacing—was often treated with chromated copper arsenate (CCA) in order to protect the wood from weather damage. CCA contains arsenic, a known carcinogen, which can seep out of the wood over time and stick to children’s hands, where it can be ingested or inhaled.
  • Artificial turf: Synthetic grass can contain lead, which can attach to dust particles. Those may be inhaled or ingested by humans in the surrounding area (more about lead below). Other downsides of artificial turf include vulnerability to heat stress and an increased risk of shared infection resulting from bacteria lingering on artificial turf grasses.
  • Crumb rubber: Millions of scrap rubber tires are ground up for use as a surface material on playgrounds. Ordinarily utilizing recycled materials is smart, but in this case, it’s better to pass. These tiny black, brown, red, or green pebbles may contain a slew of toxic substances, including arsenic, mercury, lead, acetone, methyl ethyl ketone, chloroethane, polycyclic aromatic hydrocarbons, benzene, and flame retardants. These substances can harm people’s lungs, kidneys, reproductive organs, and livers.
  • Lead: Older paint layers on longstanding playground equipment may contain lead, as can the soil surrounding the playground. Lead is harmful to humans when it’s ingested or inhaled, and children climbing on playground equipment may get paint chips on their hands or inhale lead particles attached to dust.
  • Play sand: Made from ground quartz, this manufactured material can contain carcinogenic crystalline silica and tremolite, a mineral related to asbestos. Each of these contaminants can be inhaled as dust and can cause lung damage.

Before you panic and steer clear of playgrounds altogether, remember these contaminants generally exist in minimal quantities, and the Environmental Protection Agency is still determining whether these contaminant levels are cause for concern.

Don’t want to risk it? The good news is we can have our cake (well, playgrounds) and eat it (… or play on it) too. By going DIY, playground builders gain more control over the materials used. And they preserve the benefits of play for the whole family (while also keeping things safe).

Why DIY Playgrounds Are Worth the Work

Abandoning play because of potentially hazardous materials would be like throwing the baby out with the bathwater. Playing outdoors is crucial for children who are developing motor, problem-solving, and observation skills. Free play is important not just for kids, but adults as well. It can help us connect with our bodies, free our minds, and feel the joy of moving and being alive.

A custom playground can provide all these benefits, not to mention allowing you to use healthier materials and maintain control over proper playground maintenance for optimum safety. It can also foster feelings of pride and self-sufficiency, teach the value of hard work, and encourage creativity during the building process.

Other benefits of building your own playground include the opportunity to customize the design to fit each family’s desires and needs. The DIY route is often a much cheaper alternative to purchasing a pre-built structure and amounts to a free entertainment system for your family for years and years to come.

How to Build Healthier Playgrounds

Ready to tackle a DIY playground project? To help ensure the building process runs smoothly, consider the following steps:

  1. Choose Safer Products: When purchasing building supplies, take the time to investigate the healthiest and safest playground materials. Here are a few tips to keep in mind:
  1. Choose Better Wood (or Wood Alternatives): A greenish tint on wood indicates it should be tested for CCA. If you’re concerned wood may contain CCA, you can order a test kit from the Environmental Working Group. Safer alternatives to CCA-treated wood include plastic and rubber lumber, composite lumber, naturally rot-resistant wood, and arsenic-free wood.
  2. Test the Soil: If you’re worried about lead levels in the soil near your playground location, test the soil using a lead testing kit. If the test is positive, work to reduce the level of lead contamination before proceeding with the playground build.
  3. Avoid Artificial Turf: It’s best to avoid artificial turf entirely. Stick to natural grasses instead. Though real grass may require more upkeep than the artificial stuff, it’s generally better for you and the environment. It helps reduce surface temperature, provides natural habitat for insects and small critters, and absorbs water runoff.
  4. Plan for Your Needs: Before purchasing supplies or designing a structure, figure out how many children are likely to use the playground, how old they are, and what kind of fixtures would be most exciting to them. There are no rules for what constitutes a “perfect” playground!
  5. Choose a Surface Material: When it comes to playgrounds, falling accounts for 44 percent of emergency room-treated injuries, so it’s an important safety practice to include cushioning beneath and around the play structure. Consider non-toxic options, such as mulches, pea gravel, and natural sand.
  6. Consider Green Alternatives: Using non-toxic materials in your DIY playground is good for people and the environment, too. The materials that meet the highest environmental standards use Forest Stewardship Council (FSC)-certified wood as well as recycled materials made from 100 percent post-consumer waste. Take things up a notch by also incorporating water conservation measures into your plans. Consider collecting rainwater and using it to irrigate the landscaping around the playground.
  7. Assume Responsibility: If you’re going to have a play structure in your own yard, it’s likely to attract neighborhood kids. Understand children may hurt themselves while playing on your playground. To help combat this, be sure to establish ground rules with children before they start playing, and check on them often. With great playgrounds comes great responsibility.
  8. Get Creative: Using a playground is an opportunity to connect with your creative side, and so is building one. Give yourself the space to get a little wild during the design process. Consider using unusual materials and configurations that suit your own desires and needs. The sky’s the limit! Playgrounds can be made from virtually anything that inspires playfulness, from classic wooden structures to shipping containers and even so-called junk! Not sure where to start? Check out these free plans.
  9. Commit to the Long Haul: Assembling a playground takes time—weeks if not months—and patience (and, hopefully, some help from neighbors and friends). It will also require regular upkeep, including painting, cleaning, or staining. It’s best to accept in advance that maintaining a playground is a year-round responsibility.

Tips For A Healthier Playground

By taking your playground into your own hands, you can provide healthy, creative opportunities for your family to enjoy all the benefits of unstructured play. Happy building!

DIY Playgrounds: A Healthier Way to Take the Structure Out of Play

Copy and paste to embed in your website:

Author information

CustomMade

CustomMade

CustomMade is an online marketplace connecting customers who want one-of-a-kind creations with professional and passionate makers of those goods.

The post DIY Playgrounds appeared first on Made by CustomMade.


Sunken Treasure

$
0
0

Sunken Treasure: Underwater Timber Stands the Test of Time

Underwater Timber Stands the Test of Time

When people think of timber harvest, Paul Bunyon in SCUBA gear is not the first image that comes to mind. However, in recent years, some companies have turned their attention toward the bounty of underwater timber that’s been hidden from sight for centuries. These logs may be described as river or lake reclaimed, deadheads, or sinkers. Boards created from sinker logs have gained desirability on the market because of the attractive color variation, durability, and perceived sustainable benefits.

How Do Trees Get Underwater?

Trees become submerged by slipping from a logger’s grasp or by growing in a valley previously dammed for reservoir construction. The scene under many artificial lakes resembles a watery ghost forest, composed of drowned trees that once stood tall along flowing creek sides or riverbanks. As sinkers are pulled to the surface, so is the history of the logging industry. Some of these trees were a part of virgin forestlands, where they stood for hundreds or even thousands of years, growing to enormous girth and density. Very few of these old growth trees remain legally accessible for harvest today, which makes the sinker logs that much more desirable.

In the nineteenth century Pacific Northwest, pioneer loggers faced the challenge of turning massive trees into lumber. Once a tree was cut, a lot of work remained to turn it into a log and then transport it to a sawmill. Oxen were the beasts of burden tasked to move logs from point A to point B along cleared paths, which became impossibly muddy, bogging down animals and cargo. To solve this issue, cross logs were placed perpendicular to the direction of travel and thick black oil helped the trees slide along. These were called skid roads, and expedited the log transport system. If a lumberjack was fired from his job, he was sent walking down the skid road, which is where the term “skid row” originated, a name that prompts an image of unemployment and squalor to this day.

As skid roads accelerated log transport, the pioneers also used a method called flashboard damming. This is where a river or creek was temporarily blocked to create a flooded area. Felled timber was dragged to the floodwaters where it would collect and float in mass. Once a sufficient number of timber was collected, the dam broke, and a rush of water and logs careened downstream where they could collect and move via railroad. This method proved to be quicker and cheaper for men and beasts alike.

As a result of flashboard damming, many smaller logs embedded in the banks. They remained abandoned and deemed unworthy of the loggers’ time and effort to collect. This created an abundance of woody debris in these waterways. The embedded sinker logs were freely harvested up until the 1990s when overzealous harvest practice drew the attention of regulatory agencies.

Log Condition Decades Later

As counterintuitive as it may seem, sinker logs provide excellent quality wood products. Wood rots when exposed to light, oxygen, and wood-consuming organisms—features lake or river bottoms lack. Many trees also contain oils that have preservative effects. When logs lay in muddy substrate for extended periods of time, the wood fiber absorbs the minerals and tannins found in the water and soil, which give the wood its unique hues of grey and olive green. If the logs were embedded in sandy soil, then the lumber may exhibit hues of red or deeper gold. If the logs are from old-growth trees, then the wood grain is extremely dense, which increases durability and works well for flooring, countertops, and siding.

Different Hues of Underwater Timber

Extracting Underwater Logs

There are two types of underwater logs to harvest: the escaped logs from previous operations and the dead trees still rooted to the bottom. Sinker logs are collected, whereas underwater trees still need to be cut down. Each scenario requires different harvest techniques and machinery.

Sinker logs are commonly collected by small-time operations, involving a small group of people using machinery to collect one log at a time from a river or reservoir. Divers hook cables to a submerged log, which is brought to the surface with air floats or winches. The logs are then stacked on a barge or towed ashore. A one-man operation in Maine pulls in an average of 15 logs over a 12-hour day. Harvest yields vary depending on distance of travel, log abundance, and weather conditions.

Larger companies use advanced machinery, which can cut submerged rooted trees. Some deepwater harvest machines are remotely operated and dive as deep as 100 meters, putting workers at minimal risk of injury. Under good conditions, a deepwater machine can cut one tree every three to five minutes. For shallow water operations, a harvester is operated from a barge, and, with the help of cameras, an automated dynamic positioning system, and wireless controls, the operator can control a telescoping boom arm to harvest underwater trees. These trees are cut and moved by the arm to be stacked on or near the barge before being towed ashore.

Sink em: From untouched riverbeds to floorboards

Riverbed to Floorboards: Marketing the Lumber

After the time and effort are put forth to extract the sinker logs, there are additional production costs before the wood is ready to sell. These include storage, mill, transport, and drying. Sinker logs can be sold directly to the consumer, or wholesale to commercial retail. Retail prices for the lumber vary widely depending on the quality grade of wood, wood cut, species used, and transport costs. Many of the sinker logs sold in the U.S. are sourced from the southern states, such as Louisiana or Florida. A cypress puller who intends to sell the wood directly to retail consumers may sell it for an average of one to four dollars per board foot. Commercial retail prices range from two to five dollars per board foot. By the time high-quality sinker cypress wood reaches a California show room, it can range from eight to fourteen dollars per board foot.

Underwater Logging and the Environment

Boards cut from recovered logs are touted as sustainable or environmentally friendly, largely because they are not harvested from terrestrial forests. This insinuates terrestrial forestry is unsustainable and pulling logs from aquatic systems is a notch up on the illusive sustainability scale. In reality, there are costs and benefits to each method of timber harvest.

One method of harvesting sub-aquatic trees is to pull them up from lake or river bottoms, causing a disturbance of sediment that results in an increase of turbidity. Turbidity is a measure of water clarity calculated by how well light scatters throughout a liquid. High sediment suspension in the water leads to an increase in total suspended solids. When turbidity is increased at an unnatural rate, this creates problems on multiple levels within an ecosystem—blocking light for photosynthetic organisms, smothering egg nests, and inhibiting hunting abilities of aquatic animals, to name a few.

Highly specialized underwater harvester machinery reduces this impact by cutting the upright trees rather than pulling them up by their roots. There is also the incentive to reduce turbidity so the underwater cameras are able to function for the operators. Although the harvesters minimize turbidity impacts, there are other impacts to consider such as riparian effects from haul out sites and staging areas, as well as the consequences of removing structures in an aquatic ecosystem that have been in place for decades, sometimes centuries.

From the standpoint of steelhead, for example, the sinker log provides an important role in habitat contribution in a river system. Just like terrestrial forests, aquatic habitat can be enhanced with structural diversity. A log wedged into a river bottom provides shelter from the currents. The log changes the flow pattern of the river to create eddies that bring in food and washes away fine silts, allowing formation of gravel beds. These gravel beds are crucial for anadromous fish spawning, allowing a place for eggs and young fry to hatch and develop without immediately getting washed away to sea. Logs in creek systems are significant sources of habitat quality, and when most of these logs are removed from a system, it could have detrimental effects on fish populations, not to mention other countless riverine species and the geomorphology of the river itself.

Unearthing an Ecosystem: The Effects of Removing Sunken Timber

Another way to look at terrestrial timber harvest practices is that the harvest lands are in the business of tree production. Trees are harvested, replanted, and harvested again in calculated cycles. Old growth forests are rarely if ever cut due to environmental regulations that reserve critical habitat for listed species. The timber industry has the practice of logging (now called forestry) down to a very distinct science, and is constantly working with regulatory agencies on environmental impacts at local, state, and federal levels. There are many levels of how “sustainable” a company may be harvesting, from very low habitat consideration (i.e. clear-cut logging) to variable retention harvests (i.e. mixed levels of thinning with the goal of mimicking natural disturbance events).

Rules of the River: Regulating Underwater Logging

Pulling logs from watersheds will prompt a string of environmental regulations if operations occur within the United States. This is a likely reason underwater logging companies may take their business to places beyond U.S. borders. There are levels of agencies a sub aquatic harvester will work with, from local city or county departments to state and federal agencies. These agencies are responsible for upholding environmental laws and guiding the harvester through the process.

In California, the alterations of watershed components triggered a Lake and Streambed Alteration Agreement (LSAA). In 1999, the impacts of removing logs from watersheds were determined to be significant enough to require the applicant to undergo California Environmental Quality Act (CEQA) evaluation. If impacts are determined to have a “substantial adverse affect,” then the project will require an environmental impact report (EIR). The CEQA process is in place to minimize negative environmental consequences by evaluating potential impacts and providing mitigations measures while delivering information to the public.

States other than California are subject to federal regulations such as the National Environmental Policy Act (NEPA), Clean Water Act (CWA), and Rivers and Harbors Act. Agencies that oversee these regulations are the Fish and Wildlife Service, U.S. Army Corps of Engineers, and National Marine Fisheries Service. For a summary of the legal processes that involve watershed alterations, check out the Guide to Watershed Project Permitting. The focus is on California, but provides a good review of federal guidelines as well.

Conclusion

The science that specifically addresses underwater logging is lacking, meaning the long-term effects on aquatic ecosystems can be hypothesized but not fully understood. To deem one method of timber harvest as more sustainable than another is mainly a marketing strategy, because there is no reliable method currently in place to quantify the concept of sustainability. If there is no way to systematically test an idea, then companies are free to use the rhetoric to their benefit without being required to show evidence. Thus, instead of asking how sustainable a product is, perhaps the consumer should ask different questions that relate specifically to their personal needs or concerns.

Sunken Treasure: Underwater Timber Stands the Test of Time

Copy and paste to embed in your website:

Author information

CustomMade

CustomMade

CustomMade is an online marketplace connecting customers who want one-of-a-kind creations with professional and passionate makers of those goods.

The post Sunken Treasure appeared first on Made by CustomMade.

E-waste on the Rise

$
0
0

Tackling the Electronic Waste Problem

Last year, the world produced nearly 54 million tons of electrical and electronic products, but only a fraction of it was reused, refurbished, or recycled. With a relatively short lifecycle, e-waste now litters dumpsites all over the world, exposing humans and the environment to toxic materials.

Some eco-conscious offices use industrial desks made mostly from recycled materials, while a number of homeowners have turned to reclaimed barnwood to create sustainable desks and entertainment centers. However, despite any sustainable intentions, there’s no stopping the constant influx of new and improved technology. In a world where a single year renders a cellphone obsolete, electronic waste is a big and growing problem.

Before you dump your smartphone in favor of the newest model, read on for more facts and figures about e-waste and how to properly dispose of your electronics.

E-waste on the Rise Infographic

Copy and paste to embed in your website:

Author information

CustomMade

CustomMade

CustomMade is an online marketplace connecting customers who want one-of-a-kind creations with professional and passionate makers of those goods.

The post E-waste on the Rise appeared first on Made by CustomMade.

DIY Desk

$
0
0

DIY Desk: Do Away with the Chair and Get Standing

Do Away with the Chair and Get Standing

“I get satisfaction of three kinds. One is creating something, one is being paid for it, and one is the feeling that I haven’t just been sitting on my ass all afternoon.”—William F. Buckley, Jr.

Want to reinvent your workspace with something greener, more ergonomic, and better for your health? You can design and build your own custom standing desk for a fraction of what a new product will cost. And as far as DIY projects go, this one is pretty easy.

Whether it’s a multi-person desk, an at-home desk, or a reception desk, a desk is little more than a horizontal surface to work on, with a few added features for individual needs. Why not create your own custom solution from upcycled or repurposed materials? To get started, here’s an overview of how a standing desk can improve your life, plus some of the best DIY ideas out there.

Don’t Just Sit There!

Standing desks have become popular over the past several years, particularly after a series of studies showed the serious health dangers associated with the modern American practice of sitting all day. While most people have always known we could all use a little more exercise, it wasn’t until recently that we realized how badly a sedentary lifestyle affects physical and mental wellbeing.

The moment a person sits at his desk each morning, his calorie-burning rate immediately drops to one calorie per minute. Sit for six hours a day, 14 days straight: Muscles stop burning fat, blood sugar rises, and maximum oxygen consumption drops, which makes it harder to move around and puts the body at greater risk for weight gain. After a year of sitting six hours per day, that weight gain would be noticeable, as would higher cholesterol levels and loss of bone mass.

But the real kicker comes 10 to 20 years down the line. Those with a desk job may need to augment retirement savings to account for plenty of medical bills. Sitting affects almost every part of your body from head to toe, raises your risk of death by nearly 50 percent, and creates a stunning 125 percent increase in the risk for cardiovascular disease.

Dangers of Sitting All Day, Every Day

It’s possible you’ve heard standing desks are a superior alternative to the sitting kind, but the reality is slightly less cut and dried. Before tossing all the chairs in the house or office and committing to standing for the rest of your life, there are some important things to know.

Life Standing Up

When the standing desk craze first hit, a slew of reporters started testing the concept. Could standing to work improve energy and psychological wellbeing? Could it even improve writing, as it did for Hemingway? Multiple journalists set up standing desks and documented the experience. Surprisingly, these reports didn’t paint such a rosy picture. “Life is just too short to use a standing desk,” wrote Business Insider. A Washington Post reporter actually lost sensation in her feet. Before long, research confirmed what many of us might assume: Standing all day sort of stinks.

In fact, ergonomic chairs were originally developed to prevent a handful of issues, including spine curvature, varicose veins, and backaches.

So what to do? Sit all day and die of a heart attack or stand all day and injure your legs and feet? The simple solution: a little bit of each. A 2011 CDC study confirmed that “sit-stand” desks, which allowed users to vary their position, effectively reduced back and neck pain as well as improved people’s mood.

Movement and Ergonomics

The concept is simple: Our bodies were built to move and they don’t want to be still all the time. Standing desks are superior to sitting desks in improving posture, but more importantly, they make it easier to move—to shift weight from foot to foot, turn around for a conversation, and even walk away.

Incorporating some type of movement (or the possibility to change position) can lead to standing-desk benefits. Most importantly, blood circulates correctly, reducing the risk of all those diseases mentioned above (including the increase in mortality rates). Adding some movement to your day can even burn extra calories, making it easier to lose weight.

This is an important idea to incorporate into a DIY standing desk setup. Because DIY allows for more individual design opportunities, you can choose to make it sit-stand adjustable if you wish. Or, build it as an addition to a sitting desk so you can switch back and forth. You can even build a treadmill desk if you’re ambitious.

One more crucial element to consider: ergonomics. Just like a sitting desk, a poorly designed standing desk can cause lasting injuries from repetitive movements. Wherever you can, add in the ability to adjust angles and heights. A standing desk should be positioned so you can stand comfortably—possibly on an anti-strain gel mat—and so your arms rest at a natural 90-degree angle, with your elbows close to the body and without twisting at the wrist.

Stand Right: Standing Desk Ergonomics

Once you’ve got the ergonomics right, and have the opportunity to move, you’ve got a standing desk that will likely make you feel invigorated and engaged even after a long day. Better yet, this desk will better meet your exact preferences when compared to commercial versions.

Why DIY?

If you’ve been considering the switch to standing, you’ve probably made an uncomfortable discovery. A new standing desk can set a buyer back hundreds, sometimes thousands, of dollars. And since standing desks are relatively new, it won’t be easy to buy a previously used model. Creating a custom DIY desk is an obvious money-saving solution. The savings can verge on extreme. One of the designs we’ll cover below costs less than $25. But no matter what style of desk you plan to build, the odds are high that you’ll save a big chunk of cash.

When you design and build your own desk, you have the opportunity to create something that will work for personal space, work style, and aesthetic. There’s also the option to make a greener choice by avoiding brand-new products. All of the desks below are designed using upcycled and repurposed materials. It’s a win-win-win situation: save money, respect the environment, and build something that fits your style. Small wonder that in a recent Lifehacker poll, DIY standing desks came out as a clear winner over all pre-made competitors.

The Best DIY Standing Desk Ideas

Let’s start with the basics. The cleverly named Standdesk 2200 can be built right on top of an existing desk. It’s mind-bendingly simple. Place a small table on top of the desk, then attach a shelf for a keyboard. The prototype cost the inventor just $22. A quick repurpose of a used table and/or shelf could probably shave that figure down significantly. The downsides: Nothing about this setup is adjustable, it doesn’t provide the option to adjust posture, and it may not be the most stylish.

If the simplicity of that solution is enticing but the ability to switch between standing and sitting is a must-have, there are a few DIY standing desk designs that can be easily incorporated into an existing office space without forcing users to ditch a seated desk. Space-conscious designs—like this repurposed folding table and this converted bookcase—won’t take up much room or intrude on a room’s feng shui, but they’re essentially just small shelves. For a more adjustable and work-friendly option, try building a basic open cabinet (a perfect way to repurpose and give new life to old wood) and add an adjustable keyboard tray. Again, none of these ideas are particularly stylish or spacious, but we’re just getting started.

If space isn’t an issue or a bigger desktop is a necessity, the giant-table concept may be a more ideal option. There are a lot of potential variations in complexity and design, but the underlying idea is the same: a large, sturdy desktop on long legs. Feel free to experiment with the materials you have on hand rather than buying new ones. If you have access to a couple of sawhorses and an old door or countertop, it’s easy to make an incredibly simple yet height-adjustable, rustic standing desk. Looking to make use of scrap lumber? Build an all-wood desk or even make your own butcher block desktop.

Finally, you can repurpose and upcycle old shelving units, crates, tables, and other useful items to mastermind a custom standing desk design. Though seated desks are horizontally oriented, don’t forget to think vertical when making the switch to standing. There’s lots of real estate below a desktop for items including a printer shelf, a storage cabinet, and other office supplies you may want to tuck away. Be creative!

DIY Standing Desk

DIY Sit-Stand and Treadmill Desks

If you’re up for a bit of a challenge and really want to incorporate movement and flexibility into your workspace, try building a DIY sit/stand desk or even a treadmill desk. Instead of taking breaks to walk around or switching from a standing workspace to a seated one, you can stick with one well-designed desk that does it all.

Some of the best DIY sit-stand desk designs are also well suited to repurposing and upcycling. Use pipes and kee clamps to create a telescoping base for the desk, then add any type of desktop you like. Or repurpose an old adjustable-height table, adding the legs to the desktop for a piece that suits your style and your workspace. You can even make a three-position rolling desk that doubles as a coffee table.

I can personally recommend the treadmill desk concept, having built my own for about $150 (all of it was put toward a used treadmill purchased locally). The treadmill has long “arms,” which made the ideal base for a desktop made from a reused wood plank. I added two U-bolts for stability, bolted a laptop stand to the desk, and was walking and working right away.

Conclusion

Realistically, with a little creativity and some good materials there are no limits to standing desks. A desk is, after all, just a horizontal surface that makes it easier to do work. Get creative with it. Hack your space, hack your materials, and have fun repurposing not just your office, but your whole workday to create a healthier, greener, more invigorating experience.

DIY Desk: Do Away with the Chair and Get Standing

Copy and paste to embed in your website:

Author information

J.H. Fearless

J.H. Fearless

J.H. Fearless is a blogger and writer whose work explores the intersection of art, nature and culture. Her blog, "Uprooted," won the Tripbase Eco-Travel blog award in 2009 and 2011. Her work has been featured in The Huffington Post, Burning Man, National Geographic’s Green Living Website, Sharable and many more notable publications. Currently, she lives in Reno, Nevada, where she spends her time learning to garden in the desert and blogging for Burning Man each September.

The post DIY Desk appeared first on Made by CustomMade.

What a Gem

$
0
0

What a Gem: How to Pick Environmentally Friendly Engagement Rings

Pick An Environmentally Friendly Engagement Ring

Dig for a diamond that gives back with this guide to the world’s most ecologically responsible gems.

It’s the moment you’ve always dreamed of—time to buy an engagement ring. It’s a sparkling, beautiful piece of jewelry that symbolizes the depth of your love and commitment. And for many couples tying the knot, diamonds are a popular choice. They’re resilient, they come in many sizes and colors, and they look good with just about any metal band. Unfortunately, diamonds aren’t a girl’s best friend, unless they are sourced from a reputable trader. To help you out when the time comes, we’ve put together a handy guide to ethical diamonds that are not only conflict-free, but actually contribute to a cleaner environment and a healthier, wealthier society. We also provide tools to navigate size, color, and cuts in order to create the custom engagement ring that most resonates with you. But first, what is a diamond and where does it come from?

Diamonds’ Deep Origins

Diamonds extracted from the earth have been “growing” for up to 3.3 billion years. Let that sink in for a second. Diamonds crystallize as far as 118 miles deep in the earth’s mantle. Technically speaking, they are transparent crystals of tetrahedrally bonded carbon that form as a result of high temperatures and pressure. After deep volcanic eruptions that cool, the diamonds surface as igneous rocks such as kimberlites. Kimberlites are long pipes full of diamonds, and while they used to be ubiquitous, the nongovernment organization Diamond Development Initiative (DDI) notes it has been a good 10 years since new kimberlites have been found. More easily accessible kimberlites are unlikely to be found anytime soon because of the difficulty and expense associated with prospecting. While industry leaders are slightly more optimistic, nobody questions that diamonds are increasingly difficult to source and supply is dropping as demand soars.

The Big Hole: History of the Diamond

The first kimberlite pipes were discovered in the Northern Cape province of South Africa in the late 1800s. By 1872, 50,000 miners had converged in Kimberley to manually dig what is known as The Big Hole, which is 1,519 feet wide and 790 feet deep. Many people died in pursuit of the next big diamond because of hazardous working conditions, so several mining companies merged as De Beers Consolidated Mines Limited to clean up the business. A century-long, global monopoly subsequently ensued with virtually zero oversight. Twenty five countries now have substantial diamond mining operations. And for many, it’s a curse.

Beyond Conflict-free

The film Blood Diamond helped expose the world to the dirty business that is diamond trading. More than 3 million people have been killed in African countries including the Democratic Republic of Congo, Sierra Leone, and Angola as a result of civil wars fought over what we now call conflict diamonds. Eventually, the horrific stories of women and children enduring unspeakable atrocities became very embarrassing for the diamond industry, so it developed a certification standard called the Kimberley Process (KP) in a halfhearted effort to root out violence. Even though the majority of diamonds traded on the market today are certifiably conflict-free, few environmentalists or social activists take KP seriously anymore and several of its key founders pulled out due to reports of corruption, nonexistent regulation, and an effort for powerful interests like De Beers to maintain their monopoly. If a diamond trader’s best claim is that they meet KP standards, it may be best to keep looking. For conscious consumers, a conflict-free diamond simply isn’t good enough.

The Mining Process

Most modern mines use earthmoving equipment to dig massive open pits, though De Beers also mines diamonds from the Atlantic Ocean’s seabed off the coast of Namibia. There’s financial incentive to minimize disturbance in order to avoid having too much waste material to sift through, but it’s still a destructive practice that requires a good deal of water and energy, produces emissions and waste, and disrupts biodiversity. Some sellers say the best diamonds are those sourced from Canada, since they have stringent environmental and social standards. But this isn’t completely true. The Canadian Arctic Resources Committee found irreversible environmental damage has occurred at and beyond mining sites such as Ekati mine in the Northwest Territories. Water quality has changed for the worse, lakes have been drained (destroying fish habitat), and grazing wildlife like caribou are beginning to look for their food elsewhere because of serious land degradation. Even though Canada does more than most countries to ensure diamond mining has a low environmental impact, work still needs to be done. Also, if someone tells you their diamonds were mined to ISO 14 001 environmental standards developed by the non-profit International Organization for Standardization, be wary: This is a voluntary initiative with a loose regulatory framework like KP. Sixty-five percent of the world’s diamonds come from Africa—and conflict diamonds have been reduced from approximately four percent to one percent of the market since KP was implemented in 2003—but it still takes some digging to find ethical gems. As you conduct your search, the trick is to know what you’re looking for.

Ethical Diamonds: What to Consider Before You Buy

Ethical Diamonds: What to Consider Before You Buy

Fair industry standards

When sourcing your ring, look for a retailer that supports development organizations like DDI, which strives to improve industry standards and provide training programs for artisanal miners, while also working towards establishing a Fair Trade certification system to link responsible artisanal diamond mining businesses with conscientious consumers.

Fair working conditions

When buying your ring, sure everyone who has contributed to the end product—prospectors, miners, polishers—receives a fair wage for their work and enjoys pleasant working conditions. Most ethical sellers will alert you to their standards right away in order to distinguish themselves from big-box sellers.

Lab-grown

If you love the glimmer of a diamond but it’s not as important that it has been mined, consider a lab-grown diamond. Unlike simulant diamonds, lab-grown diamonds are real diamonds with the exact same molecular and physical properties as a diamond extracted from the Earth, but they are grown in a lab. They may well be the most environmentally friendly diamond you can purchase, though they won’t always come with the same kind of job opportunities for local communities as a larger artisanal mining operation.

Recycled band

In addition to worrying about where your diamonds come from, it’s important to be conscientious about the origin of the band as well. In fact, 20 tons of ore and waste rock are required to produce one standard gold band. Look for a retailer who sells rings made with only recycled gold and platinum, which will drastically reduce the ring’s footprint.

The supplier

Many people go straight to their local mall when looking for an engagement ring, but we recommend shopping around. There are plenty of boutique jewelers and online craft markets with a solid reputation for sourcing ethical diamonds, preferably from an artisanal mine or lab-grown and paired with a fair-trade or recycled metal band. No diamond on the market is 100 percent sustainable, but some are certainly better than others.

The 4 Cs

The 4 Cs

In order to help diamond consumers gauge the scale and quality of diamonds, the Gemological Institute of America developed the 4Cs of diamond quality: color, clarity, cut, and carat. Diamonds with no color are the most chemically pure, and therefore most superior. Clarity refers to how many inclusions or blemishes diamonds have as a result of being battered around by a lot of heat and pressure. When evaluating a diamond’s clarity, a jeweler looks for the number, size, and nature of these blemishes to determine how they affect the stone’s overall appearance. The fewer dings the better. Cuts, on the other hand, come in many variations. Round and princess cuts are said to be most popular because they reflect light so well (and that’s the holy grail of diamonds) but there are 10 popular shapes and hundreds more that are proprietary. Carat of course refers to size. One metric carat is 200 milligrams. GIA has several interactive charts that analyze different colors and sizes, so you will be armed with all the necessary tools before purchasing the ring of a lifetime.

What a Gem: How to Pick Environmentally Friendly Engagement Rings

Copy and paste to embed in your website:

Author information

Tafline Laylin

Tafline Laylin

Tafline Laylin is a freelance editor, photographer, and writer who specializes in environmental issues. Instead of spreading gloomy news, she attempts to focus on positive stories that will empower readers to take the necessary action to heal our planet. Tafline's work has appeared in numerous publications across the globe, including The Ecologist, The Majalla, Green Prophet, and Dwell Magazine.

The post What a Gem appeared first on Made by CustomMade.

Sipping Sustainably

$
0
0

Sipping Sustainably: Green Breweries and Wineries

Green Breweries and Wineries

Americans consume 9.4 billion gallons of alcoholic beverages a year: 87 percent beer, 8 percent wine, and the rest spirits. The environmental impact of producing, packaging, and selling all those beverages could make an environmentalist reach for a drink. Breweries and wineries consume large quantities of water, raw materials, and other natural resources.

But there’s good news: Green beer is no longer something people drink just on Saint Patrick’s Day. With the rise of the craft beer movement and growing consumer interest in local and sustainable food, more breweries and wineries are working to reduce the beverage industry’s environmental footprint. As a result, it’s easier to stock the home bar with sustainable, organic brews.

Moving Toward Sustainability

Sustainability is a buzzword these days, but what does it really mean? Ideally, it indicates a company uses resources in non-depleting ways while fostering the health of the company, workers, planet, and future generations. No beer and wine companies are entirely sustainable—at the moment they all use more resources than they return—but many mitigate environmental damage in several key ways.

Moving Toward Sustainability

  • Slash water use

Beverage companies are particularly reliant on water, one of our most critical natural resources. Conscientious businesses work to be its responsible stewards. According to a 2008 report, viticulturists on California’s North Coast use an average of 75 gallons of water to grow the grapes for just one gallon of wine, and in the state’s drier Central Valley, they use 430 gallons of water per gallon. Turning the grapes into wine uses six more gallons of water. To reduce that footprint, many wineries have installed low-flow nozzles and filtration systems, and reuse gray water from the production process. A minority employ dry farming, which means growing grapes without irrigation, a practice that can save millions of gallons of water a year.

A gallon of beer requires five to 10 gallons of water to produce. Craft brewers are leading a movement to reduce that ratio (Oregon’s Full Sail Brewery boasts a 2.5 to 1 ratio) and even the world’s largest brewers, including Anheuser Busch, MillerCoors, and Heineken, are cutting water usage.

  • Power down

From heating water vats and refrigerating beverages to lighting tasting rooms, the mass production of beverages is energy intensive. Eco-minded companies make their systems more efficient, install solar panels and solar hot water heaters, and utilize technologies such as fuel cells, geothermal heating, and carbon dioxide reclamation.

  • Manage waste streams

The majority of waste in the brewing process is spent grain. Breweries have a long history of passing spent grain on to farmers to feed cattle, chickens, pigs, and other livestock. Some are coming up with other innovative ways to use leftover grains, including making bread and composting. One brewery developed a biomass steam boiler that allows them to power brewery operations with spent grain. Conscientious vintners recycle pomace—spent grape seeds, pulp, and skins—in the winemaking process, compost it, or sell it to manufacturers of grape fruit oil, cream of tartar, or spirits. Many beer and wine companies have installed on-site wastewater treatment plants and/or reuse cardboard, pallets, and other packaging waste.

  • Farm sustainably

Beer and wine are agricultural products, so to make a sustainable beverage, the ingredients must be grown in ways that contribute to the health of ecosystems, wildlife, and workers. Unfortunately so far organic beer and wine have constituted a small share of the beverage industry. Brewers cite the expense and shortage of organic hops and barley. And wine consumers have equated organic with low quality. But that seems to be changing. According to a recent study, the organic beer and wine market is expected to grow at a rate of 24.5 percent from 2013 to 2019.

  • Source local ingredients

Wineries have a long history of growing grapes on site. Now a farm-to-pint movement is making waves in the craft beer industry. From Oregon to New York, local economies are springing up around craft beer with a new crop of farmers at the base. By localizing supply chains, beverage companies cut down on the transport of raw ingredients—a large portion of most companies’ carbon footprint. They can also more easily reuse resources that would leave the facility—including water and packaging—in the production process. For instance, they can use gray water to irrigate fields.

  • Reduce packaging

It doesn’t get much greener than a reusable jug, so it’s promising The Wall Street Journal called the warm months of 2013 “the summer of the growler.” Sure enough, grocery, drug, and discount stores in many cities now sport growler stations stocked with local craft beer. Wine growlers are cropping up in some states as well. Many breweries and wineries sell beverages in bottles, cans, or boxes for wider distribution. The most sustainable of them use lightweight containers with high-recycled-materials content.

In 2011, University of California Davis opened a state-of-the-art center to research and share the best sustainability practices for breweries and wineries in the above areas. It will eventually house the country’s first self-sustaining winery, which will feature a rainwater collection system and will have a cutting-edge filtration and recirculation system as well as a system to sequester carbon dioxide. According to the university, it will be the most “environmentally sophisticated complex of its kind in the world.” But what does stepping toward sustainability look like for companies already involved in the day-to-day business of beverage making?

Rogue Beer Innovators

“Beer begins in the dirt,” Oregon’s Rogue Ales states on its website. That’s why in 2008, when the brewery turned 21, its owners invested in hop yards in the fertile Willamette Valley and a barley farm in the rain shadow of Mount Hood. In addition, they grow rye, wheat, corn, pumpkins, hazelnuts, jalapenos, fruit, roses, and botanicals for their beverages, and raise honeybees, free-range chickens, turkeys, and pot-bellied pigs. They grow about 25 percent of the hops they use, and at least two of their ales contain all company-grown ingredients. They age their beverages in barrels they make from trees harvested from the Oregon Coast, and their bottles are made and screenprinted in state.

Rogue’s ambitious efforts to localize its supply chain stand out, but in the craft beer world, it’s not rogue to commit to sustainability. Breweries compete with each other to see who can be more eco-friendly, with larger companies such as California’s Sierra Nevada leading the movement. Sierra Nevada’s recycling and food composting programs help the company recycle 99.8 percent of waste, which earned the Platinum Zero Waste Certification from the U.S. Zero Waste Business Council. They built a brewery in North Carolina to minimize trucking as they expand distribution to the East Coast and continually work to maximize efficiency in their brewery operations. Several breweries, notably Eel River and Wolaver’s, use only certified-organic ingredients.

Leaping Toward Sustainable Wine

In the heart of California’s Napa Valley, Frog’s Leap Winery is a model of sustainable winemaking. In 2005, they installed 1,020 solar panels on a quarter acre of their vineyard, making the operation 100 percent solar powered and reducing their lifetime carbon emissions by an estimated 1,600 tons (equivalent to driving 4 million miles). Their building is LEED certified and outfitted with a geothermic warming and cooling system. They use composting and cover crops to grow their certified-organic grapes—not to mention zero water. Dry farming was common in Napa Valley until the 1970s when drip irrigation was introduced. Now 70 percent of vineyards rely on irrigation. But Frog’s Leap’s owner John Williams insists dry farming makes the plants healthier and the wine tastier. It also saves 10 million gallons of water every year.

California’s Fetzer Vineyards also stands out for its eco-friendly practices. They recycle 96 percent of their waste, get all of their power from renewable resources, and have reduced their carbon emissions by 25 percent since 2005. Frog’s Leap and Fetzer are just two on a long list of domestic wineries committed to improving practices. California’s Sustainable Winegrowing Alliance says 1,800 wineries representing 70 percent of the state’s wine-grape acreage have participated in voluntary self-assessments, and the Alliance has certified 77 wineries and 212 vineyards to be “in a cycle of continuous improvement.”

How to Sip Sustainably

Climate change may pose the most serious threat to the alcoholic beverage industry, according to a number of recent reports. Napa Valley’s grape output is predicted to decline two thirds by 2050 because of temperature increases. Similar losses are projected in France and other prime winemaking regions, according to a 2013 forecast. University of Queensland researchers warn climate change is already affecting barley production abroad and could significantly affect the taste and price of beer worldwide.

The greatest climate impact from the wine supply chain comes from transportation and is primarily accumulated during the final product shipment to the customer. So when it comes to sipping sustainably, local is the way to go.

Beer drinkers will likely have no problem finding local suds. Craft breweries have exploded in the last two decades: The number of breweries jumped from 92 in 1980 to 2,822 in 2012. Many larger towns boast one or more. Wine drinkers may not be as fortunate, since 90 percent of domestic wines are made in California. But researcher Tyler Colman offers a handy way to pick a wine with a lower carbon footprint. He discovered a green line that runs down the middle of Ohio. “For points to the West of that line, it is more carbon efficient to consume wine trucked from California,” he writes. “To the East of that line, it’s more efficient to consume the same sized bottle of wine from Bordeaux, which has benefited from the efficiencies of container shipping, followed by a shorter truck trip.”

How do you choose the most sustainable local beverage? Beware of greenwashing. Companies know even vague sustainability claims can boost sales. Critically peruse a website or take a tour to see what a company is actually doing. Independent eco-labels and eco-certification can help wine drinkers discover conscientious companies and may soon become more common in the craft beer world.

It’s always a good idea to choose the least packaging when possible. For beer, kegs or growlers are best, and cans may beat bottles. For wine, boxes are better than bottles, and magnums beat smaller bottles. Don’t forget to recycle those containers. And CEOs say consumer preference drives the trend toward more eco-friendly products, so let beer and wine companies know you’re thirsty for sustainable beverages.

How to Decipher Environmental Claims on a Wine Label

How to Decipher Environmental Claims on a Wine Label

Sulfite free – The wine contains no added sulfites, which are used to kill off unwanted wild yeast and bacteria. It may contain naturally occurring sulfites.

100% Organic – The USDA has certified that the viticulturist used no synthetic fertilizers, pesticides, herbicides, or fungicides and did not add sulfites or chemical clarifiers.

Organic – The USDA has certified that the beverage contains 95 percent organic ingredients (with the rest unknown).

Made with organic ingredients – The USDA has certified that the ingredients were grown with no synthetic fertilizers, pesticides, herbicides, or fungicides; however the winemaker may have added sulfites and chemical clarifiers.

BiodynamicDemeter, a private company, certified that the grapes were grown using organic methods and the vineyard meets other requirements aimed at making it a diversified, self-sustaining ecosystem. For instance, biodynamic farmers must use wildlife-friendly pest-control management and make their own fertilizer with resources generated on-site. They also use some more esoteric practices, like planning crops based on lunar cycles. Biodynamic wines are fermented with wild yeast, and may contain sulfites, but not synthetic clarifiers.

Made with Biodynamic grapes – The grapes were grown as above, but the winemaking production process was not certified.

Natural – The making of the wine supposedly required minimal human intervention. The term is unregulated.

Sip Sustainably Eco-labels and Eco-certifications

If you enjoyed this article on  green breweries and wineries, check out these reclaimed wood wine racks for your home —  http://www.custommade.com/gallery/custom-wine-racks/

Sipping Sustainably: Green Breweries and Wineries

Copy and paste to embed in your website:

Author information

Abby Quillen

Abby Quillen

Abby Quillen is the author of the novel The Garden of Dead Dreams and the editor of two anthologies. Her articles and essays have appeared in YES! Magazine and The Christian Science Monitor and on Common Dreams, Nation of Change, Reader Supported News, The Daily Good, Truthout, and Shareable. She lives in Eugene, Oregon, with her family. When she’s not writing, she grows vegetables and weeds, bikes and walks as much as she can, and jots down cute things her kids say.

The post Sipping Sustainably appeared first on Made by CustomMade.

Designers Corner: Kerra Michele Huerta from Apt Envy

$
0
0

About Kerra Michele Huerta

Kerra Michele Huerta

Photo credit: Natalie Grasso

As an interior and event designer in our nation’s capital and longtime renter herself, Kerra Michele Huerta has developed a knack for space planning, organization, and clever design ideas anyone can implement. She created her blog, Apt Envy, to chronicle the trials and tribulations of personalizing the tiny white box that is her rental apartment, and has since been dedicated to improving the lifestyles of those renting the American Dream. Eventually her eye for blending different patterns, styles, and trends got her noticed, and her design career was launched.

Kerra’s Picks from Current Artisans on CustomMade

Refurbished Danish Lounge Chair In White Wool Upholstery1. Refurbished Danish Lounge Chair In White Wool Upholstery Made by Dominique Provost of Dominique Provost, Los Angeles, CA

This classically elegant chair would work in a living room, office, or bedroom, and is neutral enough to blend with other colors and styles.

Killerwaves, Natural Edge Organic Bathroom Mirror2. Killerwaves, Natural Edge Organic Bathroom Mirror by Nadia Fairlamb of The Mermaids Mirror, Kailua, HI

I love the organic lines of this unique mirror. I would put it in a powder room, foyer, or bedroom. It’s a piece of art all by itself!

Rosewood Dresser3. Rosewood Dresser by Mark Cwik of Mark Cwik Studio Furniture, Chicago, IL

I am slightly obsessed with dressers because you can put them in any room of the house: in the bedroom for clothing, in the living room under a TV, in the dining room for a bar, in the entry for hats, gloves, mail, etc. They’re the most versatile piece of furniture you can buy, and this one is so gorgeous in its simplicity.

modern bronze steel pendant4. Archimedean Solid #2 Made by Douglas Werner of Oblik Studio Brooklyn, NY

Lighting is another favorite purchase of mine. As a renter, one of the best investments you can make is lighting. Whenever I move into a new apartment, I always switch out the builder-grade light fixtures and replace them with something unique and interesting. Then I take them with me when I move out! This piece might be minimal, but it makes a big statement with its beautiful, dark lines.

Deep Blue Crystalline Glazed Porcelain Bud Vase5. Deep Blue Crystalline Glazed Porcelain Bud Vase Made by Ceramicgoddess in Texas

A colorful little vase like this would add so much life to a bookcase or dresser top. I was particularly drawn to the organic shape and ombre effect of the glaze.

modern reclaimed wood coasters6. Geometric Wood Coaster Set Made by Anthony Becker of Wake the Tree Furniture Co., Lebanon, PA

These coasters are as functional as they are beautiful. They would make the perfect housewarming or hostess gift, and they’re so lovely and interesting that you’ll certainly want to buy a set for yourself!

 baby skunk print7. Baby Skunk Fine Art Print Made by Mary Jill Lemieur of Mary Jill Lemieur Designs, Petoskey, MI

What’s not to love about this cheeky little guy? This original art print is so fun and interesting, it will certainly catch the eye of anyone who enters your home. I absolutely love it!

Why I Chose these Pieces

I’m originally from Seattle and have always loved their eclectic mix of vintage and new. It’s a little bit retro, a little bit boho, a little bit modern. That effortless blend of styles always adds up to warm, comfortable, lived-in spaces that are very unique. One of the reasons why I love working in D.C. is I’m constantly renovating old rowhomes; it’s so much fun to tear out old things that don’t work for our modern lifestyles, then blend the remaining historic elements with new construction.

In that same spirit, each of the items I’ve selected would blend seamlessly in almost any style space and work with many different color schemes. They’re neither overtly masculine nor feminine, and could easily be introduced into most rooms without interruption. I also thought there was something unique about each piece, which would add depth and visual interest to the interiors they would soon call home.

Find Kerra Michele Huerta on the Web

Author information

Kerra Michele Huerta

As an interior and event designer in our nation’s capital and longtime renter herself, Kerra Michele Huerta has developed a knack for space planning, organization, and clever design ideas anyone can implement. She created her blog, Apt Envy, to chronicle the trials and tribulations of personalizing the tiny white box that is her rental apartment, and has since been dedicated to improving the lifestyles of those renting the American Dream. Eventually her eye for blending different patterns, styles, and trends got her noticed, and her design career was launched.

The post Designers Corner: Kerra Michele Huerta from Apt Envy appeared first on Made by CustomMade.

E-Readers Vs. Print Books

$
0
0

E-Readers Vs. Print Books: Which is More Eco-Friendly?

Which is the More Eco-Friendly Choice?

Reading just got a whole lot more complicated: Once confined to print materials, today’s readers now have a plethora of devices to choose from to get their literary fix. Smartphones, laptops, tablets, and e-readers are transforming the reading landscape. On the surface, this may seem like a good thing—the more people who read, the better—right?

Sure. But if you’re as concerned with environmental conservation as you are with the accessibility of literature, you might need to think twice about making a switch from paper to electronics. Follow along as we dive into the debate over eco-conscious reading.

E-readers on the Rise

Getting Bookish About Book Reading

E-readers are becoming increasingly popular. Since their debut, millions of e-readers have been sold—today, as many as one in four American adults owns an e-reader or tablet. By 2025, e-readers are projected to make up approximately 75 percent of the total market.

At the same time, the number of books produced and sold around the world has been steadily increasing. Put another way: Both print book and e-reader consumption are on the rise. Increased use of reading materials, regardless of their format, results in heightened demand for the materials required to manufacture, transport, and store them.

With great sales revenue come great questions—namely, just what are the environmental and social consequences of all this literary consumption? When it comes to determining whether e-readers or books are more environmentally friendly, there is a long (and we mean long) list of factors to be taken into consideration:

The Manufacturing of e-readers and traditional books

  1. Materials

E-reader: Producing one e-reader extracts approximately 33 pounds of minerals, including some toxic and conflict minerals, many of which are mined in underprivileged, war-torn countries. It also uses up to 79 gallons of water and produces a large amount of waste, which is dumped in landfills.

Book: Producing a book from recycled paper uses about 2/3 of a pound of minerals and two gallons of water. But it’s not all good news for the book industry: Combined, U.S. book and newspaper production requires the harvesting of more than 100 million trees, generates tremendous amounts of wastewater, and creates a sizable carbon footprint.

  1. Manufacturing process

E-reader: An e-reader’s manufacturing process consumes approximately 100 kilowatt hours of fossil fuels and produces more than 65 pounds of carbon dioxide (one of the gases responsible for climate change). As stated above, most e-reader production also utilizes toxic chemicals, which result in toxic emissions that can make asthma worse and increase the risk of premature death.

Book: Producing one book consumes two kilowatt hours of fossil fuels and approximately 7.5 kilograms of carbon dioxide, for a total of 100 times fewer greenhouse gases than those caused by the production of one e-reader. But that doesn’t mean books go easy on the environment. Paper production often poses risks to virgin, old-growth forests: The newspaper and book publishing industries consume 153 billion gallons of water each year. Producing ink for printing releases volatile organic compounds into the atmosphere, which can aggravate smog and asthma.

  1. Transportation

E-reader: Most new consumer electronics are produced abroad, which means your new e-reader probably had to be shipped across oceans and land to make its way into your hands. All that shipping requires burning a huge amount of fossil fuels.

Book: This one’s tricky, as it depends on whether a book was purchased online (and if that purchase required transport by air or over land), whether a book was purchased at a bookstore (and if that purchase required driving to the store), etc. Suffice to say transportation by plane, train, car, ship, or automobile requires the burning of fossil fuels, so few literary purchases are without their climate-change impacts. Meanwhile 25 to 36 percent of all books in bookstores are returned to the publisher, wasting tremendous amounts of energy in transportation and disposal.

  1. Usage

E-reader: One of the good things about dedicated e-readers is that the electronic ink used in most of them requires no backlighting, which is a big energy suck. How long (and how often) you use an e-reader can make a big difference, too. One study found that, for the most part, one year of use offsets an e-reader’s lifetime carbon footprint, provided the e-reader is substituted for the purchase of more than 22 books—but that number depends in part on just how many factors are taken into account. Another study found a person would need to read 40 to 50 books in order to equal the fossil fuel use, water use, and mineral consumption of one e-reader. But if climate change and human health consequences are factored in, that number can grow to more than 100 books. The good news is most e-reader devotees read upward of 35 e-books a year. But if a person uses an e-reader while continuing to buy print books (and doesn’t recycle the e-reader at the end of its life), then e-readers are definitely not the most eco-friendly choice.

Then there’s the question of how many people in a given household are using personal e-readers. If multiple e-readers are in use, then a household’s annual carbon emissions are 600-750 percent higher than they would be for a family that owned or borrowed books.

Whether an e-reader is used for activities besides reading is also a factor. If you use an e-reader to browse the Internet, check email, play movies, etc., then that prolonged usage results in more electricity consumption, which is a drain on the environment. These more sophisticated devices also require more precious materials for their manufacture.

Measures of e-readers’ environmental impacts also include the eco-implications of using the Internet itself. Consider, for example, that servers and computers used to produce and deliver digital publications use a huge amount of energy. The average server uses up to 4,505 kilowatt hours of electricity per year. (To put that in perspective, the average American household uses just over twice that each year.) Then there are factors such as the communication infrastructure required to transmit digital files across long distances, the need to recharge or replace e-reader batteries, and so on.

Book: If you read at night for multiple hours, powering the light bulb in a bedside lamp will likely use up more energy than it takes to charge an e-reader. But most of your reading occurs during daylight hours (i.e., without electric lighting), then books come out on top. Also keep in mind that books, when properly cared for, have much greater longevity than e-readers. Plus one book can be shared with literally hundreds of people in its lifetime, reducing the need to produce additional copies.

Electronic Reading vs. Paper Reading

  1. Disposal

E-reader: Electronic waste is a growing problem. There’s too much of it and many of us don’t know how to—or don’t choose to—properly dispose of portable devices. If an e-reader isn’t properly recycled—i.e., if workers (primarily in developing countries) take it apart by hand—then the people doing the recycling will be exposed to numerous toxic substances. Dumping electronic waste also takes a toll on ecosystems.

Book: If a book makes its way to a landfill, then its process of decomposition will produce twice the climate change emissions as the manufacturing process.

What You Can Do

Utterly confused? The good news is that there are a few foolproof strategies to lessen your literary carbon footprint:

  • Buy rarely, or buy used. Whether it’s a book or an e-reader, buying new products always takes a toll on the environment. Whenever you can, borrow or buy used materials.
  • If you do buy an e-reader, use it up. There’s no need to upgrade just because a retailer comes out with a glitzier version. Instead, use your e-reader until it can’t be used any more. That way, you’re helping to pay back the eco-debt incurred by the device’s production. When the device does die, recycle it responsibly. If you buy an e-reader but find that you aren’t using it, sell or give it to someone who will.
  • Buy books online. Large brick-and-mortar bookstores tend to be very inefficient because they stock more books than they sell, which means they end up shipping back a significant chunk of books to their publishers. As a result, books purchased in bookstores generally have a much bigger carbon footprint than their online counterparts (That said, smaller, local stores have big-box stores beat and they’re better for local economies.).
  • Choose recycled books. As with pretty much everything else, choosing recycled helps diminish the environmental impact of making those books in the first place.
  • Choose eco-conscious vendors. Check out this list of publishing vendors who take the environment into account.
  • Be an advocate. Whether you’re Team E-reader or Team Book, it’s pretty clear both sectors of the publishing industry could clean up their environmental act. Use your power as a consumer to call on publishers and e-reader manufacturers to consider the environment at every stage of the production and distribution processes.
  • Decide what matters most. So many factors go into this decision that it ultimately comes down to what you determine to be the most important criteria.
  • Join the library. One of the best options out there for eco-conscious book-o-philiacs is the library. Sharing distributes the environmental impact of a book over a whole community and promotes reuse over new production. Want more bonus points? Walk or bike to the library. [You might want to mention that many libraries now loan out e-books.]

The bottom line? When satisfying the bibliophilic itch, buy less, borrow and share more, and get yourself a library card. Mother Earth will thank you.

If this article has you inspired to pick up a book, check out these bookshelves for storage. – http://www.custommade.com/gallery/custom-bookcases/

E-Readers Vs. Print Books: Which is More Eco-Friendly?

Copy and paste to embed in your website:

Author information

CustomMade

CustomMade

CustomMade is an online marketplace connecting customers who want one-of-a-kind creations with professional and passionate makers of those goods.

The post E-Readers Vs. Print Books appeared first on Made by CustomMade.


Designers Corner: Gina Baran

$
0
0

About Gina Baran

Gina BaranGina is a Boston based Interior Designer. Her love for interior design started when she was just a little girl. Constantly changing around the furniture layout and updating the paint colors in her childhood home, her family knew her passion for home design and decor. After a career in the corporate world, she took a leap and followed her passion and dreams. Her drive and love for the art of design has developed into a career as culmination of her formal interior design education and practical experience in the interior design industry. Gina’s style is diverse with special affection for transitional design mixing modern elements with timeless style.

Gina’s Picks from Current Artisans on CustomMade

Book Matched Sycamore And Steel Dining Table1. Book Matched Sycamore And Steel Dining Table Made by Donald Mee of Donald Mee Designs, Indianapolis, IN

Dining tables are so versatile. While designing a room I use them as their traditional purpose of being a place to sit and eat meals at but I also love using them in unconventional ways. Dining tables like this gorgeous wood and steel combo are great for a less formal eat in kitchen but also perfect for an office space as a relaxing option to a conference table. This table is very versatile and can be used in multiple décor styles from a country setting, traditional and even in mid-century modern. I was immediately drawn to this table for it’s texture. The perfect mixture of wood and metal.

Custom Large Letters2. Custom Large Letters Made by Niti Parikh of Happycardboards By Npstudio, Berkeley, CA

Initials and lettering are becoming very on trend when decorating. I love the look of a great gallery wall of photographs in mixed size frames with a few unexpected pieces thrown in like a large initial letter. My husband and I had a large letter B at our wedding that guests signed instead of a guest book and we have it hanging on our wall so we will always see it.

Contemporary Ottoman3. Contemporary Ottoman Made by Mark Erwin of Pacific Mfg. Co., Phoenix, AZ

This black and white herringbone fabric would add a punch to any room in your home. I personally would style this stunner in a living/family room with a metal tray on top (to match it’s feet of course) or even styled near a closet as a place to sit and take off your shoes.

Blue Pottery Nesting Bowls4. Blue Pottery Nesting Bowls Made by Meghan Howard of Tulane Road Pottery, Columbus, OH

These beautiful blue nesting bowls would add so much color to your kitchen. I love how the blue and white mix to give a bit of a lavender tint and they remind me of the beautiful colors of the Atlantic Ocean. These are perfect for not only mixing food but serving as well and are a gift anyone would love to receive. I know I would!

Hospitality Pineapple Door Knocker Brass5. Brass Hospitality Pineapple Door Knocker Made by Michael Healy Designs, Manville, RI

Pineapples signify hospitality and mean “welcome” so what a better way to welcome someone into your home than with this beautiful brass pineapple door knocker. I am immediately drawn to the texture and raised effect in the detail of this piece.

Modern Style Four Poster Platform Bed From Reclaimed Wood6. Modern Style Four Poster Platform Bed From Reclaimed Wood Made by Mike Schmiedicke of The Strong Oaks Woodshop, Front Royal, VA

Who doesn’t love a great statement piece? One that says “wow” when you walk in the room? That is what this modern four poster bed does for me. I believe that a bed is one of the most important investments you can make in your home. This bed can fit all décor styles and is full of impact. I especially like the wide base and wood tone.

Handmade Stoneware Vase With Celtic Knot And Checkered Pattern7. Handmade Stoneware Vase With Celtic Knot And Checkered Pattern Made by Neale & Anna Lasalle of Clay With Me, Ellsworth, ME

Fresh flowers are an instant way to give your home a pop of color. This black and white stoneware vase is perfect to showcase flowers. Whether you prefer pink roses or yellow Gerber Daisy’s this vase will make them look beautiful. I was immediately drawn to the Celtic and checker print and it’s adorable shape.

Why I Chose these Pieces

I am born and raised a New England girl and although I have never lived outside of Massachusetts I feel that being a New Englander I am constantly mixing décor styles. I love the sophistication of traditional design that you always see around this historic city but I am also drawn to more modern elements.

Since the day I started my interior design company in 2011 I have never stopped learning and growing as a designer. I find my best work comes from taking risks and chances and really following my intuition. Adding elements and creating texture in a space is very important to my design style. Interior Design to me is not only a great esthetic but also, and more importantly, a feeling.

In my designs, no matter what style décor, I want my clients to get that feeling.
The pieces I selected are all pieces, that when added to a room will complete the room in it’s own way. Pieces that ten to twenty years from now you will still love and treasure.

Find Gina on the Web

Author information

Gina Baran

Gina is a Boston based Interior Designer. Her love for interior design started when she was just a little girl. Constantly changing around the furniture layout and updating the paint colors in her childhood home, her family knew her passion for home design and decor. After a career in the corporate world, she took a leap and followed her passion and dreams. Her drive and love for the art of design has developed into a career as culmination of her formal interior design education and practical experience in the interior design industry. Gina's style is diverse with special affection for transitional design mixing modern elements with timeless style.

The post Designers Corner: Gina Baran appeared first on Made by CustomMade.

A Sticky Problem

$
0
0

Is Chewing Gum Harmful to the Environment?

Whether it’s being used as a mid-day breath refresher or on the playground to see who can blow the biggest bubble—chewing gum is a daily habit for many people. But what happens when you’re done chewing it? 80–90% of chewing gum is not disposed of properly and it’s the second most common form of litter after cigarette butts.

Chewing gum is made from polymers which are synthetic plastics that do not biodegrade. When it’s tossed on the sidewalk, there it sits until it’s removed which can be a costly, time consuming process. Littered gum can also make it’s way into the food chain. It has been found in fish where it can accumulate toxins over time. Sustainable chewing gums have been produced. These gums are natural, biodegradable substances. Cities are also implementing gum receptacles to cut down on waste. In a six month period these trash cans cut down on littered gum by 72%.

Next time you get ready to toss your gum, consider aiming for a trash can instead of the side walk.

Not-So-Green Gum: Is Chewing Sustainably a Reality?If this infographic has you thinking about making more sustainable choices, check out this furniture made from reclaimed wood — http://www.custommade.com/gallery/barnwood/

Copy and paste to embed in your website:

Author information

CustomMade

CustomMade

CustomMade is an online marketplace connecting customers who want one-of-a-kind creations with professional and passionate makers of those goods.

The post A Sticky Problem appeared first on Made by CustomMade.

Designers Corner: Stephen Martyak of studiotyak

$
0
0

About Stephen Martyak

Stephen-MartyakStephen Martyak is the design principal at studiotyak — a multi-disciplinary design and branding studio in Boston, MA dedicated to enhancing the urban environment through the design of dynamic restaurants, entertainment venues, and private residences. Just like the firm’s name (the “y” is silent), studiotyak believes that every project is unique and possesses its own quirks that should be embraced to ensure that the personality of the concept, client, and space leaves a mark on the vibrant city experience.

Stephen’s Picks from Current Artisans on CustomMade

Dog Lamp1. Dog Lamp Made by Jeremy Medow of Tungsten Customs, Milford, CT

Quirky elements bring personality to a space. The best pieces combine humor with quality craftsmanship and an excellent use of material. The Dog Lamp gets an A+ in my book, from the contrast of the white shade and stained wood down to the braided cord.

Nixie Tube Clock2. Nixie Tube Clock Made by Jeremy Medow of Tungsten Customs, Milford, CT

Clocks are one of my favorite design elements, but with our focus being restaurants, we rarely use them. You never want the customer thinking about the time. However, with this other great piece from Tungsten Customs, time takes a back seat to awesome execution. Cannot wait to find the perfect place for one of these!

Empire Leather Wafer Top Stool 3. Empire Leather Wafer Top Stool Made by Connor Sweet of Urban Industrial, Antioch, CA

Ask my assistant, I am on an Art Deco kick right now and these barstools totally fit the bill. With a base that references the shape of the Chrysler Building, the Empire Stool is a much welcomed take on the reclaimed/vintage barstool. Sweet Fabrication knows how to fabricate some sweet pieces!

Jack Stools4. Jack Stools Michael Padykula of Kula Solutions, Portland, OR

The Jack Stool is another cool take on the reclaimed barstool; I especially love the contrast between the white car jack base and the solid wood top.

Custom Walnut Scrabble Board 5. Custom Walnut Scrabble Board Made by Marc Nicoloudis of Bit & Beam, Portland, OR

Whether it be a chess set or this beautiful Scrabble Board, games make great accessories. Having just played a great deal of Scrabble over Christmas, this game board would make the perfect addition to my family coffee table and an heirloom to pass down from generation to generation. This piece definitely gets a Triple Word Score in my book.

Bartizan Desk6. Bartizan Desk Made by Forest Dickey of Varian Designs, San Francisco, CA

Now this is a desk! The Bartizan Desk pairs high-concept with high function. The base with its structural lines and elegant connection to the set of drawers provides the perfect support for the large worktop. Do not put this baby in the corner…

Find studiotyak on the Web

Author information

Stephen Martyak

Stephen Martyak is the design principal at studiotyak — a multi-disciplinary design and branding studio in Boston, MA.

The post Designers Corner: Stephen Martyak of studiotyak appeared first on Made by CustomMade.

Energy Efficient Hacks for a More Eco-Friendly Home

$
0
0

Energy Efficient Hacks for a More Eco-Friendly Home

Save up to a quarter of your annual electricity bill with these simple energy-saving tips.

Thanks to a series of brilliant innovations, we can extract and burn the decomposed remains of animals and plants that lived millions of years ago, and use it to keep our homes warm in winter, cool houses in the summer, enjoy hot showers, and read long after the sun goes down.

The average American household spends about $2,200 on electricity each year. Collectively, the country’s 115 million homes account for roughly 22.5 percent of nationwide energy consumption. Given that fossil fuels are finite, it’s logical to think we would use this resource as sparingly and efficiently as possible—but we don’t. Instead, our homes waste a great deal of energy because of leaky windows, inefficient appliances, and other easy-to-fix issues. To put the power back in your hands, we have compiled a list of simple hacks everyone can use to cut down on energy costs, and get a more eco-friendly home and a healthier bank balance.

In a bid to make American consumers more aware of their home’s performance, the U.S. Department of Energy breaks down where and how energy is typically consumed. Space heating gobbles up a whopping 42 percent of the average home’s energy, heating water uses 18 percent, refrigeration 5 percent, lighting 5 percent, and another 5 percent can usually be attributed to cooling. Computers, home entertainment systems, and other devices make up the remaining 25 percent. In each case, even small interventions can shave kilowatt-hours off your utility bills. We have included a few suggestions for existing homes as well as ideas to get off to a low-energy start in a new or renovated home.

How We Use Energy in Our Homes Space Heating

If you walked around the house with an incense stick on a windy day, you may be amazed at how many leaks there are (clue: watch for the incense smoke to blow horizontally.) The older the home, the less airtight it probably is. If a house is leaky, that means the heating system has to work overtime to keep the space warm. Here are a few places you may find drafts:

  • Windows
  • Fireplace
  • Attic
  • Basement walls
  • Ceilings
  • Crawl spaces
  • Around fixtures and lights
  • Doors

Once you locate leaks, the Department of Energy recommends insulating the areas that allow heat to escape. Use heat-resistant products with the Underwriters Laboratories (UL) logo for optimum safety. While a professional can perform an official audit of a home, budget-minded folks can definitely locate and repair sneaky leaks without the pros.

Another way to reduce energy required for heating is to dial down the thermometer when you’re away from home, or when you’re sleeping. Either you can do this manually, or set a programmable thermostat at the coolest temperature you can tolerate. It turns out the greater the difference in indoor and outdoor temperature, the harder your heating (and cooling) system has to work in order to maintain that discrepancy. Energy.gov estimates for every one degree of temperature reduction, you can expect to save roughly one percent of your energy bill.

Rather than replace every window in the home (it’s not worth scrapping an old-school stained glass window for efficiency’s sake) there are ways to get the most out of each window. Passive solar heating is a really effective way to keep a home warmer without forking out more money. In the northern hemisphere, keep the blinds of south-facing windows open during the day in winter so the sun’s warmth can penetrate the interior and warm up the space naturally. At night, be sure to draw the curtains to trap in the heat for as long as possible. Note that a large percentage of most energy bills stem from heat escaping from windows, so it really pays to give them a bit of extra tender loving care.

Refrigeration

Often times, refrigerators are set to unreasonable, and unnecessarily cold, temperatures, which devour energy. ENERGY STAR rated appliances perform much better than their archaic predecessors, but it still makes sense to keep the fridge at roughly 38 degrees Fahrenheit, and the freezer at zero. It’s also important to keep the freezer well defrosted, since ice buildup reduces efficiency. Also, the consumer energy center advises that a top freezer is the most energy efficient option.

It probably goes without saying, but the larger the fridge, the more energy necessary to run it. For those with a large family, a giant double-door fridge with an icemaker and water filter may make sense. But for one- or two-person homes, consider a smaller unit.

Lighting

For the longest time, alternatives to energy-hungry incandescent bulbs were not only prohibitively expensive, but the quality of light from by compact fluorescent lamps (CFL) or light emitting diodes (LED) could not convince most consumers to make the switch. Thankfully, consumers now have the option for more efficient bulbs as well as a range of choices for warm, comforting light. The upfront investment in CFLs or LEDs may be higher, but these bulbs last considerably longer, and use much less energy over their lifetimes. Illuminating a home with LEDs will result in the most significant savings—up to 25 percent in energy costs plus a 25 times longer lifetime than an incandescent bulb.

Make the Switch to LED Bulbs

Another really easy, relatively obvious way to cut back on lighting costs is to turn the lights off when not in use. Better yet, consider installing wireless sensors, which switch on lights only in the presence of movement. Additionally, there’s generally no reason to use artificial light in the middle of the day. Either use lightweight shades or blinds that allow in natural light or keep window treatments raised, if your location and climate permit. Not only does this make sense in terms of your energy footprint, but it is more aesthetically pleasing and healthier as well. And to really reduce your long-term expenditures, a set of indoor and outdoor solar lamps provide free energy and pay for themselves in no time at all.

Cooling

Many of the heating tips above apply to cooling as well, but there are a couple of other hacks you may not have considered. Ever noticed how animals instinctively go straight to shady areas when the sun is beating down? We can use shade to our advantage as well. Plant a deciduous tree outside south and west-facing windows to provide shade in summer. Before winter hits, the trees will drop their leaves, making way for solar gain to passively heat the house. Another useful tip is to decorate interior spaces with light-colored furniture that reflect heat.

Water Heater

The water heater is perhaps the most overlooked home energy guzzler. Think about it: Every time you turn on any hot faucet or run the dishwasher or washing machine, you place a demand on the hot water heater. A more efficient on-demand water heater or one with a massive storage tank might save you up to 18 percent of your energy bill with a few savvy hacks:

  • Lower the thermostat to no more than 120 degrees Fahrenheit.
  • Insulate the water heater, paying close attention to manufacturer specifications.
  • Use less hot water in general.
  • Wash clothes in cold water with suitable detergents and change the settings to cooler temperatures on the dishwasher if you can.
  • Consider installing a solar-powered water heater.

Electronics

Most people don’t realize when electronics remain plugged in they continue to draw power, even when not in use. This wasted energy is commonly referred to as vampire power. Slay it by plugging electronics into smart power strips that know when to cut off the energy flow to electronics no longer in use. Like many of the tips above, such a seemingly negligible upfront intervention can result in significant long-term savings. And remember to favor a laptop over a desktop computer, which requires more energy to function.

Sucking the Life Out of Devices Even When They're Not in Use

Conclusion

These hacks demonstrate how even a handful of small, low-tech interventions can slash your energy footprint, save money, and give you the satisfaction of knowing you have done your part to lower humanity’s overall environmental impact.

If this article has you interested in  updating your home, consider installing one of these stained glass windows — http://www.custommade.com/gallery/custom-stained-glass/

Energy Efficient Hacks for a More Eco-Friendly Home

Copy and paste to embed in your website:

Author information

Tafline Laylin

Tafline Laylin

Tafline Laylin is a freelance editor, photographer, and writer who specializes in environmental issues. Instead of spreading gloomy news, she attempts to focus on positive stories that will empower readers to take the necessary action to heal our planet. Tafline's work has appeared in numerous publications across the globe, including The Ecologist, The Majalla, Green Prophet, and Dwell Magazine.

The post Energy Efficient Hacks for a More Eco-Friendly Home appeared first on Made by CustomMade.

Designer’s Corner: Andrea Canty and Allison Tilly Carswell of Red Door DesignWorks

$
0
0

rddw bostonAbout Andrea and Allison

Andrea Canty and Allison Tilly Carswell started Red Door DesignWorks in 2007 when they combined their experience with design, color theory and human behavior, with their shared love of interior styling. Together, they work with individuals and corporations in the Boston area to define practical, creative living and working environments. One of their guiding principles is bringing great design to all, and they welcome assignments ranging from one-hour consults to ongoing full-service projects. Services include room redesign and styling, art placement and hanging, interior decorating, and interior and exterior color consultation. They also team with local realtors to stage homes prior to going on the market.

Andrea and Allison’s Picks from Current Artisans on CustomMade

“With Valentine’s Day in mind, we envisioned a living space with a little something special. Red is used selectively, for impact, while neutral white, grey, black and wood tones set a sophisticated, quiet backdrop. We always take advantage of opportunities to play with patterns, textures and silhouettes. This adds interest, even when staying within a tight color range.”

Metallic Plaid Wallpaper1. Metallic Plaid Wallpaper Made by William Ulrich of Azure Cricket, San Francisco, CA

This wallpaper has just the right amount of shine and pattern, bringing in plaid–which we particularly love at the moment. You could use this paper in the dining room, or on a wall surrounding the living room fireplace. Equally as striking would be papering your entry way with this pattern. What a great way to announce to friends and family that they are entering a special place.

Bubinga Lounge Chairs2. Bubinga Lounge Chairs Made by Brian and Andrew VanVreede of Bucks County Craftmasters, Newtown , PA

These chairs. My oh my, are they gorgeous. These are reproduced after the design of Richard Neutra, modernist American architect who was guided by art, landscape and comfort–design ideals we can heartily embrace.

Odessa Lamp in Black3. Odessa Lamp in Black Made by Michael Mccoy of Castlewerks, Groton, MA

Named after the rare black Calla lilly, this lamp is described by its maker as feminine with an aura of majesty. We’d say this is the perfect way to shine a light on your sophisticated interior. We chose this lamp for its graceful lines, which are echoed in the structure of the Bubinga chair and the original print textile.

StaceyJoy Elkin Original Textile4. StaceyJoy Elkin Original Textile Made by Staceyjoy Elkin of RedLipstickDT Textile Design Studio, Detroit, MI

Speaking of that original textile, we chose it for this space because of its color, and the interesting geometries in its pattern. This textile would be a good choice for throw pillows. If you were looking for high impact, you could use it for drapery… particularly in an otherwise neutral room without an existing focal point.

Sunburst Mirror5. Sunburst Mirror Made by Craig Forget of Carpenter Craig, Windsor, ON

We always try to put some reflective or shiny elements into a space; it adds energy and enriches the viewpoints. This mirror’s dark reclaimed wood is beautiful. The lack of uniformity in the lengths and widths of wood keeps this mirror from being at all ordinary.

Custom Dog Portrait by David Scheirer6. Custom Dog Portrait by David Scheirer Made by David Scheirer of David Scheirer Watercolors, Woodbine, MD

Whenever possible, we work with our clients to either unearth from their collection or procure for them a unique piece of art to showcase in their room. And giving your special someone a surprise, custom portrait of your beloved pet, home or vacation spot seems to us like brilliant stroke for this year’s Valentine’s Day gift!

Find Red Door DesignWorks on the Web

Each Friday on Facebook it’s RDDW Music Friday. In honor of February 14, here’s the ladies’ Valentine music pick especially for Custom Made:

Author information

Andrea Canty and Allison Tilly Carswell

Andrea Canty and Allison Tilly Carswell started Red Door DesignWorks in 2007 when they combined their experience with design, color theory and human behavior, with their shared love of interior styling. Together, they work with individuals and corporations in the Boston area to define practical, creative living and working environments. One of their guiding principles is bringing great design to all, and they welcome assignments ranging from one-hour consults to ongoing full-service projects. Services include room redesign and styling, art placement and hanging, interior decorating, and interior and exterior color consultation. They also team with local realtors to stage homes prior to going on the market.

The post Designer’s Corner: Andrea Canty and Allison Tilly Carswell of Red Door DesignWorks appeared first on Made by CustomMade.

Viewing all 105 articles
Browse latest View live